Wasabi Theme for WordPress Documentation
💡BEGINNER’S GUIDE: if you are new, we recommend you start here:
❓ Before you begin
Is there a demo?
Yes, you can see how the public part of the template looks at this address, in some web examples: https://wasabitheme.com/demo/
We do not offer any trial, but you can browse the documentation to see how to use and configure the theme. We also recommend that you take a look at the following pages:
Video creating a website from scratch with Wasabi Theme
How many types of licenses are there?
There are four types of licenses. We offer a lifetime license that will allow you to use Wasabi forever on one website, and you will enjoy lifetime updates and premium support.
We also have three other licenses that are not lifetime, but differ only in the number of sites that can be activated to receive support and updates. Check them out here.
I only need the license for one site, can I upgrade it in the future?
Yes, no problem. You can buy as many as you need now and upgrade to a higher plan in the future.
When you upgrade, you will only pay the difference in price between the two options and the time remaining until the license expires.
Once you are a Wasabi Theme customer, you can upgrade the license whenever you want by performing the following steps:
- Log in to your Wasabi Theme account.
- Navigate to the Licenses tab.
- Click on Upgrade License.
- Select the new plan you want.
- Complete the payment process.
Does the template get updated?
Yes, of course. Here you can see the list of updates. We are improving the template day by day based on (always welcome) feedback from our customers.
Am I entitled to support?
Yes, if you have an active license. You will never be alone and we will always address your questions and suggestions. You can contact us from the contact page.
What do I need to use Wasabi Theme?
The technical requirements for the theme to function properly are as follows:
- You need a server with PHP 7.2 or higher with the mbstring, dom, json, libxml, curl, and iconv extensions enabled and updated.
- WordPress 5.7 or higher.
- Gutenberg.
All of the above requirements can be easily met on almost any hosting. If they do not comply with them, you can request that they do so, generally you will get them to upgrade the service at no cost.
How to check if your server meets the requirements
We have developed a tool that will do the checks for you, wasabi-requirements-checker.
Now we explain how to use it step by step:
- Download our Wasabi requirements checker tool.
- Upload the file wasabi-requirements-checker.php to the root folder of your site.
- Open your browser and navigate to http://your-domain-example.com/wasabi-requirements-checker.php.
- Once you have verified that all the requirements are met, delete the file wasabi-requirements-checker.php from your server.
What would happen to my site if I don’t renew Wasabi?
Nothing will happen, your projects will remain intact.
Not renewing the Wasabi license only means to lose the right to support and to stop enjoying updates.
Can I request a refund?
We offer 30 days money back guarantee for new users, during which time you can thoroughly test the theme on your own domain to decide whether it is useful or not.
Check the refund conditions here.
Is it compatible with other plugins?
Wasabi Theme should be compatible with any plugin. We have validated and verified that it is compatible with the most widely used, for example:
- AAWP
- Yoast SEO
- Rank Math
- Page Generator Pro
- WordPress Automatic
- WooCommerce
- Elementor
- Thrive Architect
- Content Egg
- Shortcodes Ultimate
- Ninja Forms
- Contact Form 7
- LuckyWP Table of Contents
- Wordfence Security
- WP Rocket, W3 Total Cache, LiteSpeed and other caching plugins.
- WPML
If you find any issues or notice that the template styles are overwritten by a plugin’s styles, just let us know so we can fix it. Most of the time, it has an easy solution. To report a problem, use the contact form.
▶️ First steps
How do I install Wasabi Theme?
From the WordPress dashboard
To install Wasabi using the WordPress uploader, follow these instructions:
- Make a backup of your site.
- Log in to your WordPress site’s admin area.
- Navigate to Appearance > Themes.
- Click on “Add New”.
- Click on “Upload Theme” and “Select file”, then select the Wasabi ZIP file.
- Click on “Install now”. The installation of Wasabi will begin.
- Once the installation is complete, you can activate it to start using it. You can also see how it would look without activating it by clicking the “Preview” button.
Do I get an error with the message upload_max_filesize exceeded or exceeded?
The problem is that your server is limiting the maximum size of the files you upload. Contact your hosting provider to increase this value in the corresponding php.ini directive.
Another way to bypass this error is to install Wasabi via FTP (although we recommend the previous option).
By FTP
To install Wasabi via FTP, follow these instructions:
- Download the Wasabi installation ZIP and extract it on your computer (local).
- Connect to your server via FTP and navigate to the /wp-content/themes/ folder of your site.
- Upload the wasabi folder (step 1) to the themes folder of your server (step 2).
- Log in to the admin area of your WordPress site.
- Navigate to Appearance → Themes.
- Hover over Wasabi and click “Activate”. You can also see how it would look without activating it by clicking the “Preview” button.
How do I activate the license?
You must activate the license in order to receive updates and technical support.
You can do it from Wasabi Theme Options (in the side menu) > Theme License.
How do I update the theme?
You can update the theme in the Appearance section > Themes or in Desktop > Updates.
Wasabi Theme will show you a notification every time an update is available.
You can see the change history here: Detailed Wasabi Theme Changelog.
You can enable automatic updates from Appearance > Themes
How to force an update manually
Manually updating the theme requires several extra steps compared to automatic updates. The procedure is as follows:
- Download the Wasabi installation ZIP from your panel on Wasabi Theme.
- Log in to the admin area of your WordPress site.
- Navigate to Appearance > Themes.
- Click on “Add New”.
- Click on “Upload Theme” and “Select file”, then select the Wasabi ZIP file.
- Click on “Install now”.
- When it finishes, you will have the latest version of Wasabi Theme on your site.
Have you updated and visual elements are not displayed correctly?
It is very likely that your browser is displaying outdated versions of Javascript and CSS files modified in the last theme update.
It is not a serious problem, since it only occurs in browsers that have previously visited the page, due to the browser’s own cache system.
To fix it, do the following:
- Clear your browser cache. If you don’t know how, here are instructions for the most popular browsers.
- If you use any caching system (with a plugin or at the server level), clear that cache.
- If you use any plugin that minifies or combines JavaScript or CSS files, regenerate those files.
- Disable the “Remove query strings from static resources” option in Wasabi Settings -> WPO -> HTML.
Creating a Website with Wasabi Theme: Installation, Main Features, and User Guide
- 0:00 Installation and activation.
- 0:13 Custom SEO categories.
- 0:33 Amazon affiliate or other programs: Products, Comparison, and Best Seller List.
- 3:56 Google AdSense or other advertising networks.
- 4:38 Professional homepage and clusters.
- 6:22 Internal linking with SEO SILO structure.
- 7:02 Customize the look and feel of the site.
- 10:00 Optimize loading speed.
- 10:22 SEO and structured data.
- 10:37 Google Analytics, Google Tag Manager or Yandex.Metrica.
- 10:51 Automatic or manual ads.
- 11:29 Amazon, eBay and AliExpress Affiliate APIs.
- 11:45 Self-updating dates.
- 12:14 GDPR Cookie Consent Banner.
- 12:42 Find out-of-stock affiliate products.
📝 Licenses
How long does the license last?
Our lifetime license is valid forever, so you will never need to renew it. This means you can enjoy updates and premium support indefinitely.
Our other licenses are valid for one year from the moment of validation. These licenses will automatically renew each year unless you cancel your subscription. We will send a reminder email a few days before the renewal to remind you. Renewals will automatically be applied with a 30% discount.
If you decide to cancel your subscription, the theme will continue to function normally, but you will stop receiving updates and support. Additionally, this will result in the loss of the 30% discount.
What happens when the license expires?
Nothing will happen, your projects will remain intact.
Not renewing the Wasabi license only means to lose the right to support and to stop enjoying updates.
The theme will still work on your site, but you lose access to support and compatibility updates, security and upgrades. You also lose the automatic 30% discount for license renewals.
If you want your site to have the most stable and secure version of the theme, yes. You should also renew if you want to continue benefiting from the improvements we are adding in Wasabi Theme based on feedback from users like you.
Updates (as you may have noticed) are frequently released to fix discovered problems and to introduce new features.
Does the license renew automatically?
Yes, your license will automatically renew after one year with a 30% discount applied. If you have a lifetime license, you will have access to support and updates forever, with no need to renew.
How much does the renewal cost?
If it renews automatically, a 30% discount will be applied to the current offer price. If you delay the renewal until after this period, no discount will be applied, and you will lose the bonus.
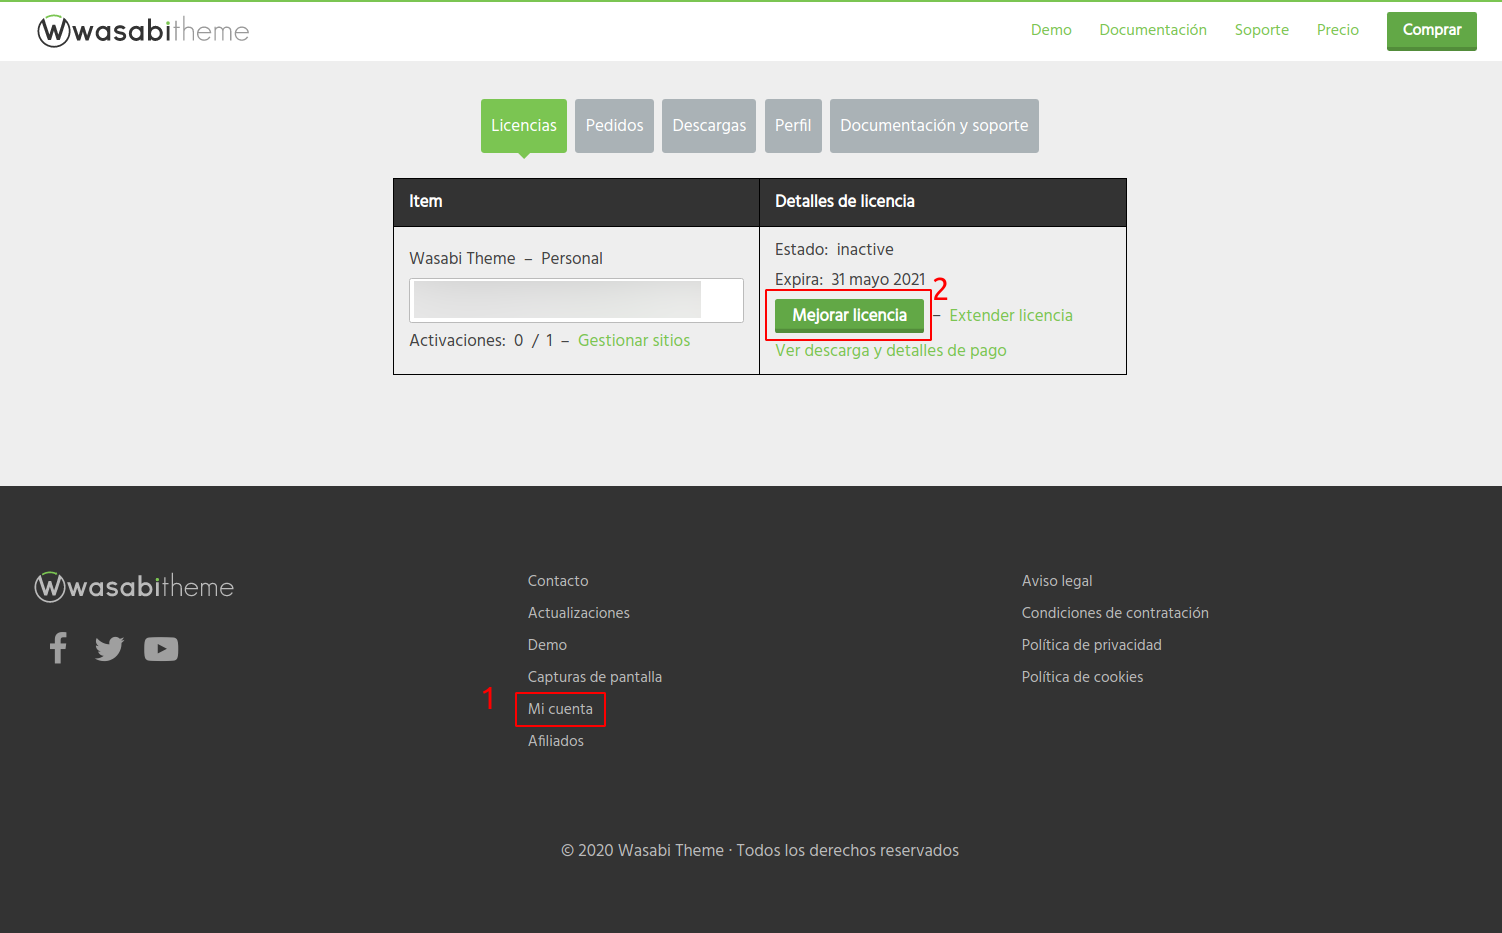
How can I manually renew my license?
Simply access your user panel at https://wasabitheme.com/my-account/ and click on “Extend license“.

You’ve already renewed, what now?
That’s it, you don’t have to do anything else.
The license key will be the same but with a renewed expiration date.
How can I upgrade my license?
You can easily upgrade your license to a higher plan to be able to use Wasabi Theme on more sites.
By upgrading the license, you will only pay the difference in price between the two options and the time remaining until the license expires.
To improve the license:
- Access your account on Wasabi Theme.
- Navigate to the Licenses tab.
- Click on Upgrade license.
- Select which plan you want the new one to be.
- Complete the payment process.
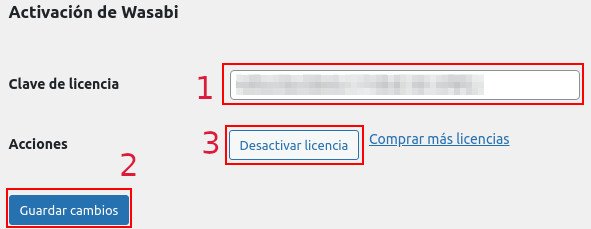
How can I change the domain license?
You can do this by deactivating the license on one site and activating it on another.
You can also centralize everything from the “Licenses” tab in your Wasabi panel (by clicking on “Manage sites”).
Do not hesitate to contact us if you need help.
Do we offer a lifetime license?
Absolutely! We offer a lifetime license for those looking for a long-term commitment to our theme.
With our lifetime license, you get unlimited access to all features and future updates, as well as lifetime access to our premium support without the need for renewal.
It’s a great way to ensure ongoing support and lifetime improvements for your website!
Errors activating the license
Error: Uploaded file exceeds the upload_max_filesize directive in php.ini
This error appears when your server limits the size of the uploaded files, in this case, the theme ZIP.
To correct the error, you will have to instruct your hosting provider to increase this limit.
If you have experience administering servers, you can change the value upload_max_filesize directly from the php.ini file. You can read more about it here.
You can also bypass this restriction by performing the update manually via FTP.
Error: Allowed memory exhausted
This error appears when your server runs out of RAM to complete a task.
To correct the error, you will have to instruct your hosting provider to increase this limit.
If you have experience administering servers, you can increase it by following these steps:
- Add this line to the wp-config.php file: define(‘WP_MEMORY_LIMIT’, ‘256M’);
- Change this line in your server’s php.ini file: memory_limit = 256M;
Deactivating and removing unused plugins may also help.
Error: cURL error 28
If you see this error, it means that your server and the Wasabi Theme update and licensing server are unable to connect.
This is a common problem and is not related to plugins, themes or WordPress itself. It is something directly related to a server component: the cURL library, and affects any web software that uses cURL.
To solve it, contact your hosting provider and:
- Ask if your server is running a recent version of PHP and the cURL library.
- Have them try increasing the server’s memory limit and cURL timeout limit.
- Ask if there’s any firewall or security module (e.g., ModSecurity) blocking outgoing cURL requests to https://wasabitheme.com/
- Ask if there are any network issues, DNS resolution problems, or outgoing SSL connections to https://wasabitheme.com/
- Ask if the server can use TLS 1.2 as the SSL protocol. You can check it yourself using this plugin.
Error: cURL error 25
Your server is using too old a version of CURL or OpenSSL. You need to update both.
🚀 Speed Optimization (WPO)
How to Improve Loading Speed with Wasabi Theme: Step-by-Step Guide
Hosting features and server configuration
At this point we will try to optimize the TTFB (Time to First Byte). This is the time it takes for the server to respond to the browser request. It includes, mainly:
- DNS Resolution.
- Application code execution (in this case, the core of WordPress, plugins, and theme).
- Database queries.
- External API queries.
- Disk read and write operations.
- Server and client network speed.
To optimize the above points, hire a hosting service that includes:
- PHP version 7.4 or higher.
- PHP OPcache extension enabled and configured.
- Web server with public cache: LiteSpeed, OpenLiteSpeed, Apache + Varnish, Apache + Nginx as a reverse proxy, etc.
- HTTP compression with Brotli. You can test it here: https://tools.keycdn.com/brotli-test
- HTTP/2 protocol supported. You can test it here: https://tools.keycdn.com/http2-test
- Configure the time resources should be cached by the browser.
- Optional: in-memory cache system (memcached, Redis, etc.). This will be useful if you want to set up a private cache system.
The first 5 points are essential (especially point 3). Most hosting providers offer them, just check with them before hiring the service.
Recommended Hosting:
NOT Recommended Hosting:
- Hostinger
If for whatever reason they cannot offer you a web server with a public cache system, we recommend you to look for another provider or, failing that, use a WordPress plugin that emulates it (usually by creating static HTML files from previously processed PHP). It won’t work as efficiently as server-wide caching, but it’s a lot more than nothing. Some of these plugins could be:
- WP Rocket
- WP Fastest Cache
- W3 Total Cache
- WP Super Cache
If you choose to use a plugin for caching, you should uncheck all options and use only its caching system, since for everything else we will use Wasabi Theme’s native functions.
Wasabi Theme configuration
Use only strictly necessary plugins
If you can just use Wasabi Theme and an SEO plugin like Yoast or Rank Math, you’re pretty much set. There are many clients who have only needed those two things to create websites both monetizable with AdSense and affiliate systems.
Using additional plugins (such as Ultimate Shortcodes, AAWP, etc.) will worsen the loading speed by loading resources such as fonts, styles, scripts. At this point, Wasabi can do nothing for you. Just try to do without them. It will improve your WPO no matter what theme you use.
Disable Google fonts or optimize their loading to avoid rendering blocking
Wasabi Theme uses Google fonts every time you configure some typography in the theme’s Appearance options.
These sources are the main causes of CLS (cumulative design changes) issues in Core Web Vitals reported by Google Search Console. The most common errors are:
- FOIT = Flash of Invisible Text.
- FOUT = Flash of Unstyled Text.
To avoid these problems, the most accurate solution we offer, if typography is not critical to your web design, is to disable Google fonts. This can be done by checking this box:
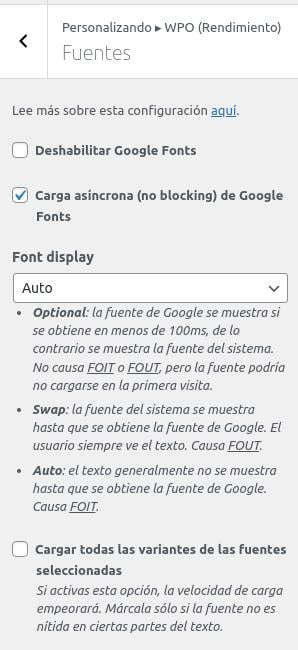
The above solution is by far the most effective, but if you have considered it and you really need to use Google fonts, we recommend setting up these options:
- Enable the “Asynchronous loading” checkbox to prevent render-blocking. If this reduces the CLS, you can try disabling it.
- Choose the “Optional” option in the “Font display” selector.
- DISABLE the “Load all variants of selected fonts” option.
The Font display options for Wasabi are as follows:
- Optional: the Google font is displayed if obtained in less than 100 milliseconds; otherwise, the system font is displayed. This does not cause FOIT or FOUT. The only drawback is that the font may not be displayed if the user’s browser has not previously downloaded it (by visiting our website or another using the same font).
- Swap: The system font is displayed until the Google font is obtained. The user always sees the text. Causes FOUT. This is the second preferred option if the first option is not viable.
- Auto: The text is generally not displayed until the Google font is obtained. Causes FOIT.
Compress images
Compress images before or after uploading. You can compress images before uploading them using a service like https://kraken.io/ or after uploading them, using a plugin like Smush or EWWWW Image Optimizer.
We also recommend using SVG images for the logo and category icons. Why? Because Wasabi will detect that it is a vector and will add it “inline”, avoiding the latency that can be caused during the image loading. The SVG format also usually involves smaller file sizes than other formats.
You can search for SVG icons at https://www.flaticon.com/ (or similar) and compress them with https://jakearchibald.github.io/svgomg/ before uploading.
Make sure that the SVG has the attributes width and height defined, and if possible also viewBox. Otherwise, it may not be displayed and you will see a blank space.
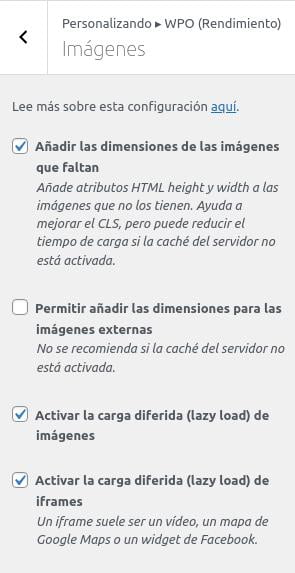
Delayed loading of images and iframes
We recommend enabling deferred loading of images and iframes.
ONLY IF YOU USE SOME CACHE SYSTEM: we also recommend you to enable the “Add missing image dimensions” option, this way the height and width attributes will be added to the images that do not have them, to avoid layout changes and CLS problems. Again, this option is not recommended if you do not use cache, as it consumes a lot of resources.
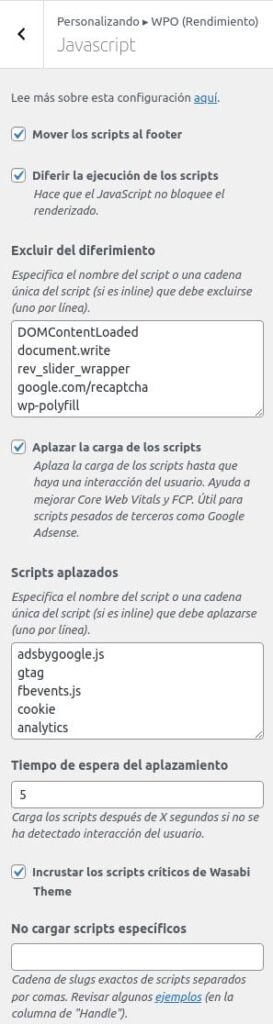
Load Javascript (scripts) in a deferred way so as not to block rendering
Try to do without all those plugins that add too much CSS, JS, fonts or icons. Try as much as possible to use Wasabi, Yoast (or similar) and little else.
Enable the “Defer script execution” option so that scripts do not block rendering. As a complement or as an alternative measure if the above generates a problem, you can activate the “Move scripts to footer” option to achieve the same result (without the small performance bonus offered by the first option).
We also recommend activating the “Embed Wasabi Theme critical scripts” option.
Google AdSense
How can you tell if Google AdSense ads are affecting performance?
- Go to https://pagespeed.web.dev/ and run the test for the affected URL.
- Review the OPPORTUNITIES section found below the metrics in the results.
- Do elements like the ones we point out below appear? If so, AdSense is “killing” the loading speed.
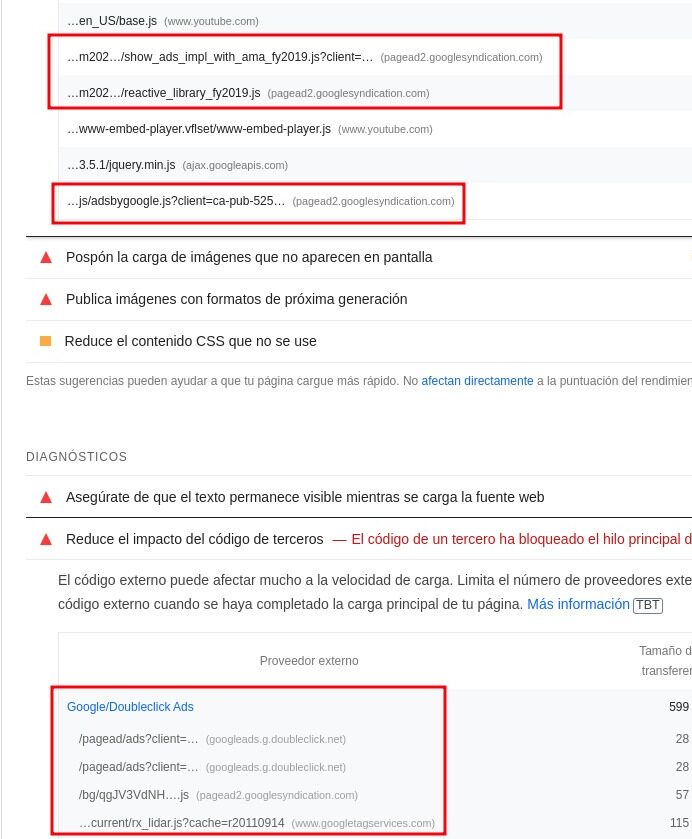
Solution:
Activate the “Postpone script loading” option with a “Postpone timeout” of 5 seconds.
This will cause the scripts defined in the “Deferred Scripts” field not to be loaded until there is a user interaction or until the seconds defined in the timeout have elapsed.
VERY IMPORTANT: As the ads will take longer to load, it is possible that the % of page views and revenue will drop, so don’t forget to review the metrics to assess whether you should prioritize loading speed over revenue or vice versa. Until Google tightens up on advertisers to ensure only light ads, this is the most we can do.
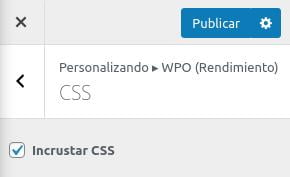
Optimizes CSS loading (styles)
We recommend that you enable the “Embed CSS” option. This will cause all the necessary CSS code to be added in the head.
Wasabi Theme is optimized to require only the CSS needed on each page. For this reason it is very important to try to do without plugins that add CSS, as they are generally not optimized for this purpose.
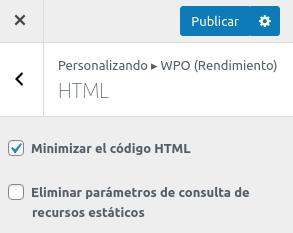
Minimizes HTML code
If you want to gain a little extra performance, you can enable the“Minimize HTML code”option.
These two options will not have a noticeable impact, but they may help to improve the numbers in tests such as GTMetrix. Moreover, the “Remove static resource query parameters” option is only for that purpose and we generally recommend to have it disabled.
Can I use Wasabi and WP Rocket or similar plugins?
Yes, but we do not recommend it if you already have cache on your server.
If you use any web performance plugin like WP Rocket, we recommend you to enable its caching options and disable all its other optimization options (minification, defer JS, etc.). Using only Wasabi Theme’s performance options is usually the best option, since we avoid conflicts and slowdowns due to function redundancy.
In case you have to install it because your server does not have any caching system, we recommend you to disable all its options and use only its caching system. The rest of the features are already integrated in Wasabi Theme and you can configure them in the options shown in this guide. It is much simpler than it seems.
What hosting do you recommend for achieving the best performance?
Any that includes:
- PHP version 7.4 or higher.
- PHP OPcache extension enabled and configured.
- Web server with public cache: LiteSpeed, OpenLiteSpeed, Apache + Varnish, Apache + Nginx as a reverse proxy, etc.
- HTTP compression with Brotli. You can test it here: https://tools.keycdn.com/brotli-test
- HTTP/2 protocol supported. You can test it here: https://tools.keycdn.com/http2-test
- Configure the time resources should be cached by the browser.
- Optional: in-memory cache system (memcached, Redis, etc.). This will be useful if you want to set up a private cache system.
The first 5 points are essential (especially point 3). Most hosting providers offer them, just check with them before hiring the service.
Recommended Hosting:
NOT Recommended Hosting:
- Hostinger
PageSpeed indicates that jQuery is not being used, how do I remove it?
Wasabi Theme can work without jQuery, so you can try to enable the “Disable jQuery” option.
jQuery is a dependency of the WordPress core itself and many other plugins, so if you detect that something does not work as it should after enabling the option, disable it.
How can I prevent AdSense ads from harming the loading speed?
How can you tell if Google AdSense ads are affecting performance?
- Go to PageSpeed Insights and run the test on the affected URL.
- Review the OPPORTUNITIES section found below the metrics in the results.
- Do elements like the ones we point out below appear? If so, AdSense is “killing” the loading speed.
Solution:
Activate the “Postpone script loading” option with a “Postpone timeout” of 5 seconds.
This will cause the scripts defined in the “Deferred Scripts” field not to be loaded until there is a user interaction or until the seconds defined in the timeout have elapsed.
VERY IMPORTANT: As the ads will take longer to load, it is possible that the % of page views and revenue will drop, so don’t forget to review the metrics to assess whether you should prioritize loading speed over revenue or vice versa. Until Google tightens up on advertisers to ensure only light ads, this is the most we can do.
How can I stop fonts from blocking rendering?
Go to WPO -> Fonts and check the box “Asynchronous loading of Google Fonts”.
How can I deactivate specific styles or scripts?
This is an advanced function, to be able to use it you need to have basic knowledge of PHP and WordPress.
To disable a script or style globally, just add its handle in these options:
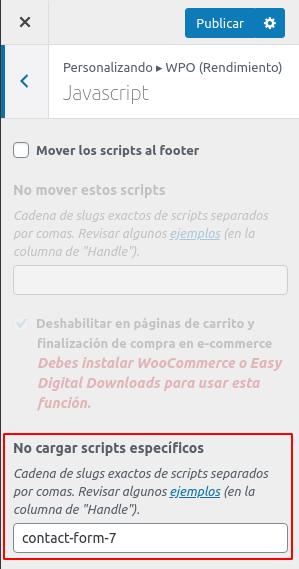
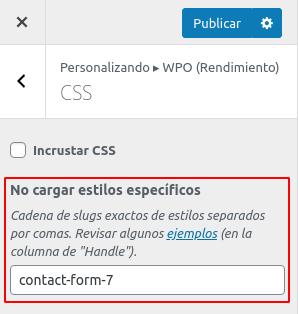
In these two options we would add, separated by commas, all the handles of scripts and styles that we want to block.
The handle can be found by looking at the source code of the plugin that loads it. If you can’t find it, you can temporarily add this code to functions.php to display a list of handlers on the web.
Remember to delete it when you find the handle you were looking for.
add_action( 'wp_print_scripts', function () {
	global $wp_scripts;

	foreach ( $wp_scripts->queue as $handle ) {
		echo $handle . ' | ';
	}
} );

add_action( 'wp_print_styles', function () {
	global $wp_styles;

	foreach ( $wp_styles->queue as $handle ) {
		echo $handle . ' | ';
	}
} );
How to activate the script or style on a specific page
In the previous step we have seen how to block the global loading of a style or script loaded by a plugin, by the theme or by WordPress itself. Now let’s see how, once blocked, it can be enabled individually on specific pages or entries.
Let’s assume that we have configured the handle contact-form-7 to never load the Contact Form plugin script and styles. Now we want it to be displayed only on the contact page. To do so, we would have to:
1. Install a child theme
You need it because we are going to edit the file functions.php. With this, we prevent the loss of modifications when Wasabi is upgraded to a new version.
2. Add lines similar to these in the functions.php file of the child theme:
add_filter( 'wasabi_script_block_bypass_handlers', function () {
	if ( is_page( 123 ) ) {
		return ['contact-form-7'];
	}

	return [];
} );

add_filter( 'wasabi_style_block_bypass_handlers', function () {
	if ( is_page( 123 ) ) {
		return ['contact-form-7'];
	}

	return [];
} );
What does this code do?
- It interferes with the filters of wasabi_script_block_bypass_handlers and wasabi_script_block_bypass_handlers of the Wasabi Theme. These filters allow us to return an array of handles (in string format) that we need to allow insertion, even if their exclusion is configured in the WPO settings of Wasabi.
- In the is_page() function, we verify that we are on a specific page. We assume that page with ID 123 corresponds to the contact page in the example.
- If is_page(123) is true, we assume that we are on the contact page, so we should return the handle of the Contact Form 7 script/style in the array of handles to allow.
- If is_page(123) is false, we return an empty array, which means we do not want to allow any of the scripts/styles configured in the Wasabi WPO settings.
Which plugins can I remove to reduce site load?
With Wasabi, you’ll have an integrated solution where you can create websites without installing as many plugins, thereby achieving WPO improvement, saving money, and increasing productivity by reducing the time required for creation and maintenance of each portal. For example, this website has been created using Wasabi + Yoast (also using LiteSpeed cache on the server): https://demo.wasabitheme.com/
In this page you will see which plugins you could get rid of if you use Wasabi. In the left column of this table you have the plugin name and, in the right column, the corresponding Wasabi native function that provides the same or similar functionality.
In order not to make the list too long, we have not repeated plugins with similar functionalities. For example, “Easy Table of Contents” could be listed, but we have already added a very similar one (“Table of Contents Plus”).
| Plugin | Wasabi Alternative |
|---|---|
| AAWP, Amazon affiliate plugins | Product blocks and comparison table |
| AliPlugin, AliatePress, AliExpress Affiliate Plugins | Product blocks and comparison table |
| eBay affiliate plugins | Product blocks and comparison table |
| Thirsty Affiliates | Obfuscation and link cloaking settings |
| Content views | Cluster block of entries or pages |
| Google Site Kit | Analytical adjustments |
| Yandex Metrica | Analytical adjustments |
| Table of Contents Plus | Column block and table of contents |
| WP Rocket and other CSS and JS optimization plugins | If you have server cache, you can do without it and use Wasabi Theme’s WPO settings. |
| Lazy Load | WPO settings |
| Easy Google Fonts | Font and WPO settings |
| Add Category to Pages | SEO Adjustments |
| Categories Images | Category Editor |
| Ad Inserter, Advanced Ads, Adsense Ads Plugin, etc. | Wasabi’s automatic ad inserter and ad block |
| Cookie Consent Banner | Cookie Notice |
| Social Media Share Buttons | Social media link block and social media sharing bar |
🥇 SEO Optimization
How do I enable structured data (Schema)?
Structured data can serve as clues to help Google understand the content of your site. You can for example indicate the name and logo of your organization, the author of each entry or the date of publication of a particular post.
In Google’s official documentation you can see what they are and how they work.
How to set up basic schema
To achieve structured data markup we recommend first having the Yoast or Rank Math plugin installed. These steps will show Yoast screenshots, but the same options are available in Rank Math (although the terminology may vary).
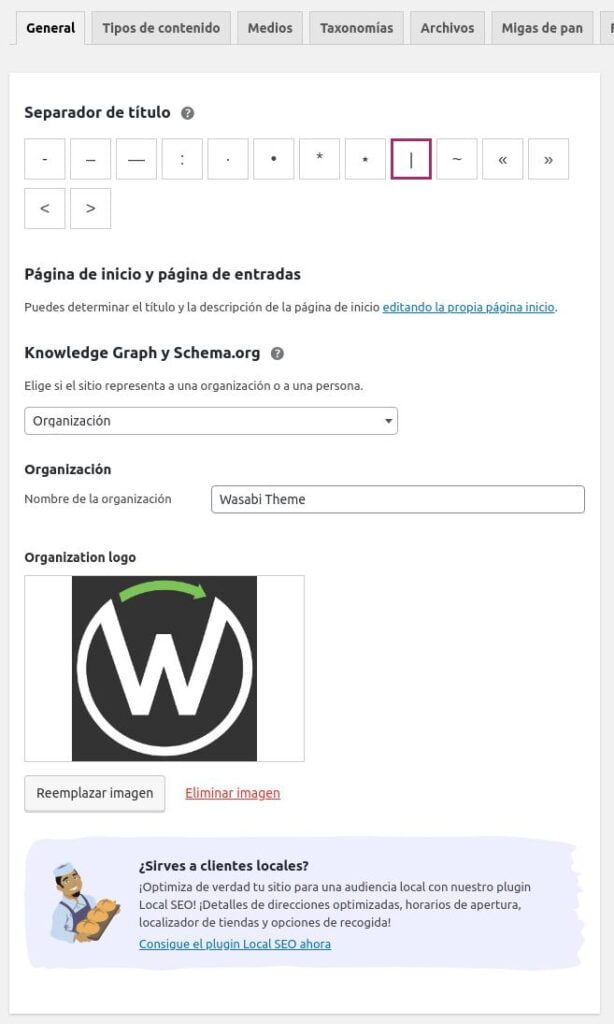
Step 1: enable Organization markup in Yoast general settings
In Rank Math you would have to go to Rank Math > Titles and Goals > Local SEO and fill in the information of the person or organization.
Step 2: enable breadcrumbs in Yoast

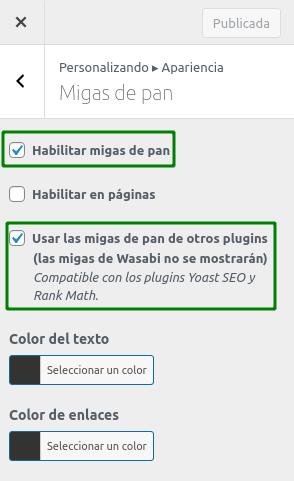
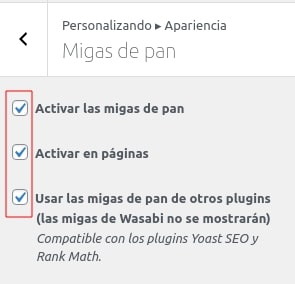
Step 3: enable the integration of Yoast breadcrumbs in Wasabi
You don’t have to enter any PHP code, just go to Wasabi -> Appearance -> Breadcrumbs settings and enable these two options:
Step 4: integrate Yoast’s structured data options with Wasabi’s options
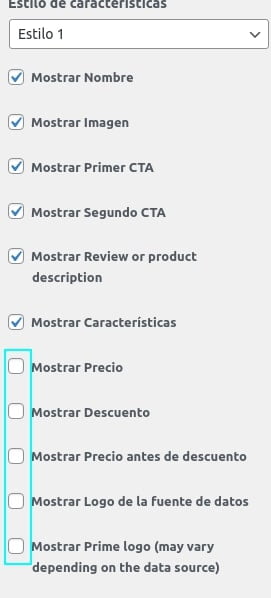
Now, on the Ajustes de Wasabi -> SEO -> Datos Estructurados we are going to:
- Disable the four checkboxes marked in red. We uncheck them because Yoast already adds this structured data, and we don’t want to display the same information twice.
- Enable the green checkbox (ItemList). This structured data markup will be displayed when using the product block or comparison table block in Wasabi. It will mark everything related to the product (URL, name, description, image, etc.).
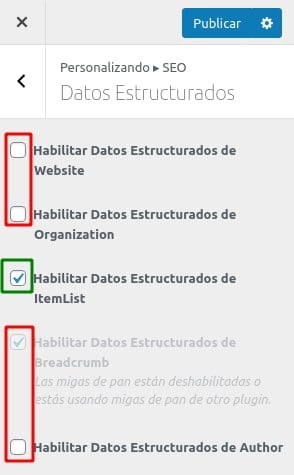
With this we would already have a markup of all the generic elements that can be found in most web pages.
How to configure specific schema
If you want to brand more specific content, I recommend you opt for concrete solutions:
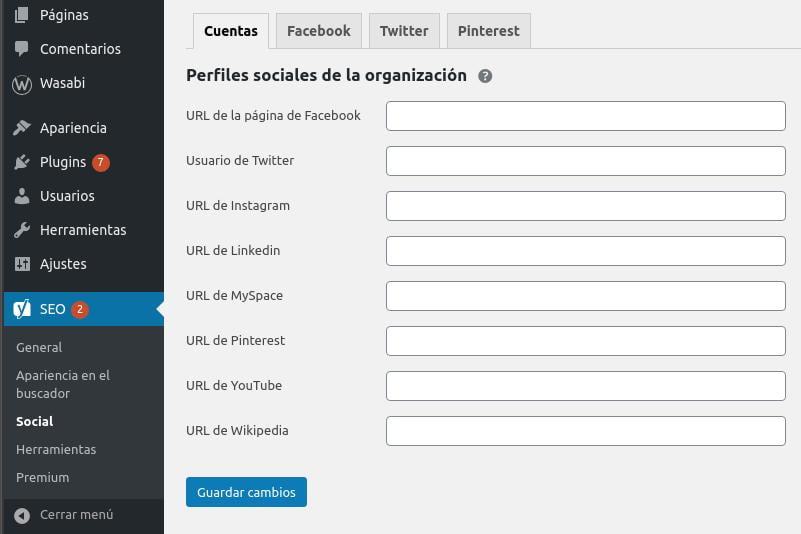
Social networks
Both Yoast and Rank Math offer us the possibility to add links to our social networks in the Organization structured data markup. The configuration is very similar in both plugins.
Schema FAQ or frequently asked questions
Yoast and Rank Math allow you to use their Gutenberg blocks to add this type of content and markup. You only have to insert and configure these blocks in the desired entry.
- For Rank Math: https://rankmath.com/blog/faq-schema#how-to-add-faq-schema
- For Yoast SEO: https://yoast.com/how-to-build-an-faq-page/
Videos and audios
If you want to bookmark videos from YouTube, Vimeo, etc., as well as audios from SoundCloud, we recommend installing the Schema plugin.
Once you do so, disable all its options (so they don’t interfere with Yoast/Rank Math) and configure the video markup as explained in this tutorial.
Author
- For Rank Math: Visit Rank Math > Titles & Meta > Local SEO and fill in the person or organization information so it can be used as author information.
- For Yoast SEO: Enable the Organization markup in the general settings of Yoast.
How do I automate dates and years in meta, content, etc.?
Wasabi offers a number of options to automate the updating of the years displayed in:
- Content of posts and pages (including the title).
- Meta description and title: compatible with Yoast SEO, All in One SEO Pack, and Rank Math plugins.
- Modification date of posts and pages.

The automation of Wasabi dates is totally unattended. If you activate it, Wasabi will detect words that correspond to years (format 20xx) and update them for the current year if they correspond to previous years.
This has its advantages, for example, you don’t have to do anything, you just enable it and that’s it. But of course, it also has its disadvantages, such as not having absolute control over which years you do or do not want to upgrade. It is designed for automatic websites, although it can also be applied to other types of projects if you are aware of the above operation. To solve this problem, please read the following section.
Prevent automation of dates on certain specific content
You can use the shortcode to avoid updating the dates found within the shortcode content:
- [
wasabi_prevent_year_automation]contenido no actualizable[/wasabi_prevent_year_automation] - Example:
- [
wasabi_prevent_year_automation]Llevamos desde 2001 en esto[/wasabi_prevent_year_automation] - Producirá: Llevamos desde 2001 en esto
- [
Prevent date automation in meta title and description of a specific post or page
- Install and configure a child theme.
- Add the following code to the functions.php file of the child theme:
add_filter('wasabi_should_auto_update_title_meta_desc_year', function ($should_update) {
    // sustituir por is_page si es una página
    // sustituir por el ID de la página o post correspondiente
    if (is_single(12)) {
        return false;
    }

    return $should_update;
});
How can I remove the word “category” from category URLs?
Depending on the SEO plugin you use, you can remove the word category from the category URL in this way:
How can I highlight posts? And change the different anchor links to the same ones?
Featured entries, will appear linked from the following sites:
- Main menu (if the automatic menu is used, i.e., if no menu is assigned manually)
- Categories
- Gutenberg block of categories inserted on the main page (if the option to show featured posts is enabled)
To mark an entry as featured, follow these steps:
- Go to the edit page of the post.
- Click on the Wasabi icon located at the top right.
- Expand the “Featured Post Settings” options.

- Enable the “Featured” option.
- Now you can optionally change the anchor of the link to the post from the different places where it will be displayed as featured.
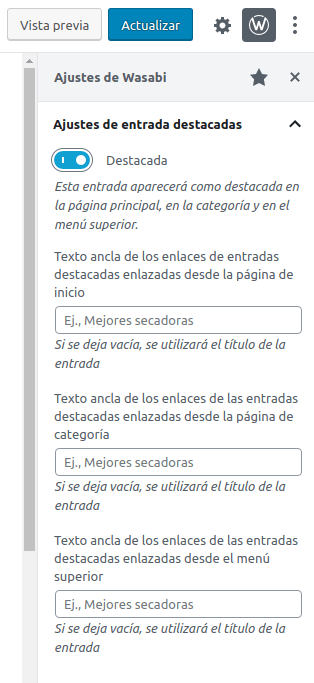
- Save the post to persist the changes.
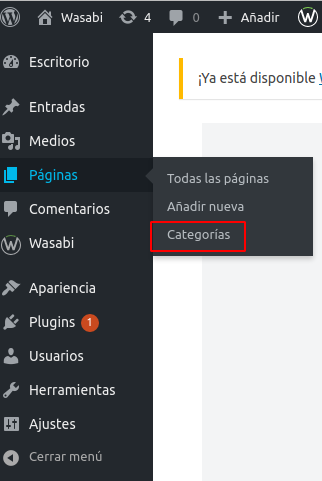
How can I add categories to pages?
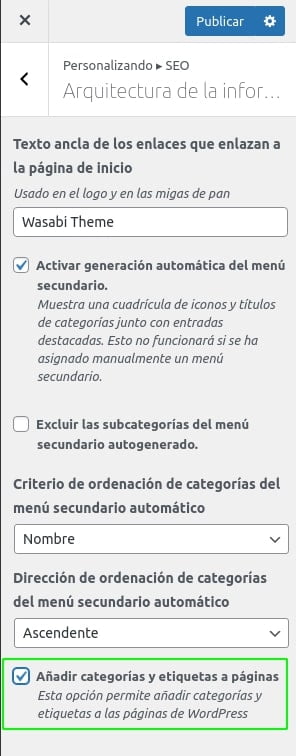
In some projects it may be necessary to hierarchize content using categorized or tagged pages. This is not something that WordPress allows by default, but Wasabi offers a feature to allow it with just a few clicks, you just have to:
- Go to the settings of Wasabi Theme
- SEO Settings
- Information Architecture Settings
- Enable “Add categories and tags to pages”
What does this change affect?
With this option enabled, we will allow the use of categories for both entries and pages. You can:
- Create categories with mixed content (posts and pages).
- Create categories only with pages
- Create categories only with posts
- Create tags with mixed content (posts and pages).
- Create tags only with pages
- Create tags only with posts
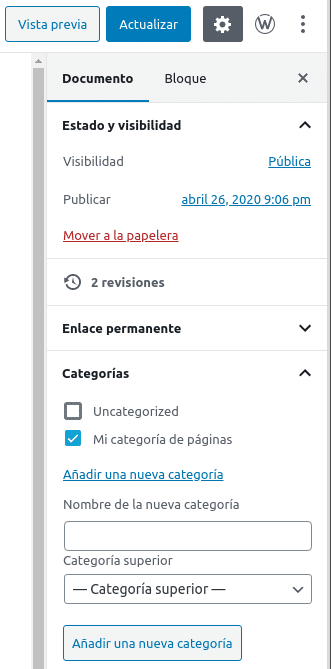
We will observe the following changes:
Categories and tags submenu appears within pages
The category and tag selector appears in the page editor.
The pages are listed on the category page and the tag page.
Whether it has been marked as featured or not.
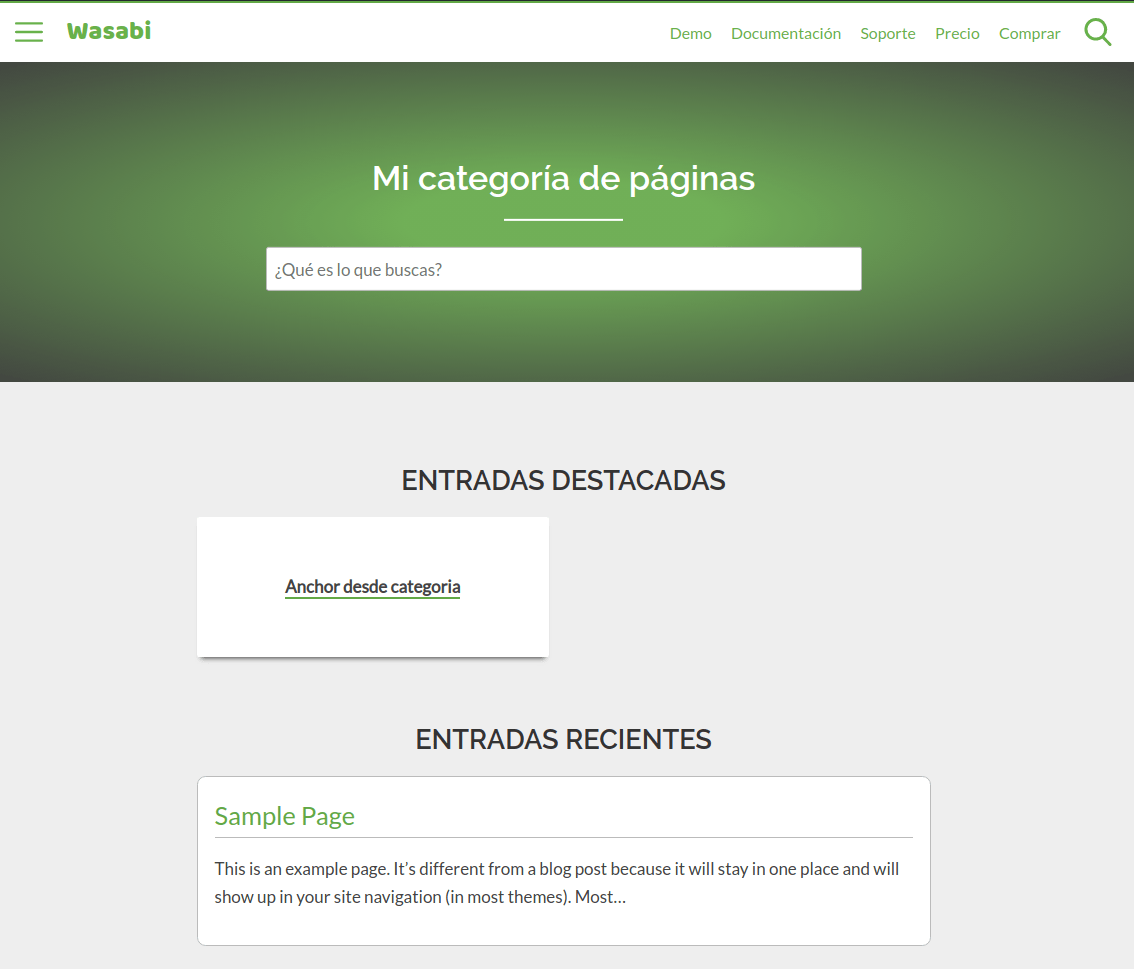
Appears in the secondary menu (if we have checked the auto-generated secondary menu option).
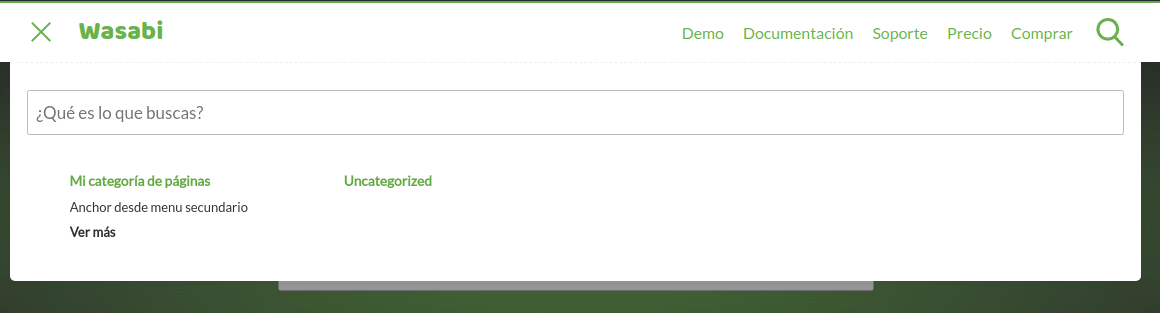
It will appear in the category grid blocks.
It will only appear in these blocks if we enable the option to show featured entries in these blocks. It will also be required (logically) to mark the page as staked in the page editor.
Categories or pages? How to create a structure of only parent and child pages
The Wasabi crumb system does not work with hierarchies of mother > daughter pages. It works with category hierarchy > page (enabling the option of “SEO > Information architecture > Add categories and tags to pages” to then categorize each page).
At that time, the page breadcrumbs would show Home > Category > Page, but would not show a hierarchy of parent and child pages.
If you want to generate the crumbs with page hierarchy (without categories), you have to enable these three options:
With the last option active, the crumbs will be generated and managed from Rank Math or Yoast, which do offer this possibility.
To link from the parent page to the child pages, you will have to insert cluster blocks in the parent page.
An entry has multiple categories, why can’t I choose the primary one?
The option to select the main WordPress category is always provided by the SEO plugin (Yoast, Rank Math, etc.).
Check that you have installed and activated one of the above plugins.
Yoast SEO indicates that no internal links have been detected, why?
It’s not a bug, as the problem is in Yoast SEO’s internal link detection system.
Yoast SEO’s link detection system detects internal links by searching for text within the post content. If it detects something in the form of a URL (https:// – http://, etc.), it counts it as a link.
This makes the detection process very fast, but also inaccurate in the case of Gutenberg blocks or shortcodes where the link is not as is in the content of the entry, but is generated dynamically by PHP.
If you switch to code mode in the post editor, you will see that the cluster block writes the URLs in the content, but keeps references to the ID of the post or page to be linked from the cluster (in the case of manual selection), to categories or tags (in the case of category or tag cluster) or has no reference at all (in the case of recent post cluster).
That is why Yoast does not detect links.
Ideally, Yoast should render the page to get the final HTML and use that HTML to fetch the URLs, not before. It’s a bit green in that regard, but I believe (or at least hope) that in the future they will do that.
If you want to play it safe, we recommend you to install Screaming Frog and study the internal linking there, as Screaming Frog does parse the final generated HTML, even if the content was generated by JavaScript, you could configure Screaming Frog to run the JavaScript of the page (although it is slower).
I’m using the YASR plugin and there are errors and issues with Products in Search Console, why?
If the error is something like:
- “offers”, “review”, or “aggregateRating” must be specified
- The “brand” field is missing
- The “sku” field is missing
- The “name” field is missing
- The name of the reviewed item is missing
- …
Then the error is being generated by the YASR plugin (the one with the little stars).
We recommend you to contact their support or try changing their settings. Here they explain more about the structured data markup that the plugin adds.
Once you have changed the plugin configuration (or disabled the plugin), you can validate the fix here. Remember to clear the cache (if you use a cache plugin) before validating the changes.
📈 Web analytics
Where do I place the Google Analytics code?
Insert Analytics tracking ID in Web Analytics > Google Analytics > Analytics ID
You only have to write the ID, not the whole code. Wasabi Theme will take care of generating the optimized loading code.
Where do I place the Google Tag Manager (GTM) code?
Insert Analytics tracking ID in Web Analytics > Google Tag Manager > AGTM ID
You only have to type the ID (example: GTM-XXXXXXXXX), not the whole code. Wasabi Theme will take care of generating the optimized loading code.
Where do I place the Yandex.Metrica code?
Insert the Analytics tracking ID in Web Analytics > Yandex.Metrica > Tag ID
You only have to write the ID, not the whole code. Wasabi Theme will take care of generating the optimized loading code.
💸 Advertising and announcements
Where do I place the Google AdSense code?
You can insert ads in Monetization: Ads > Ads list
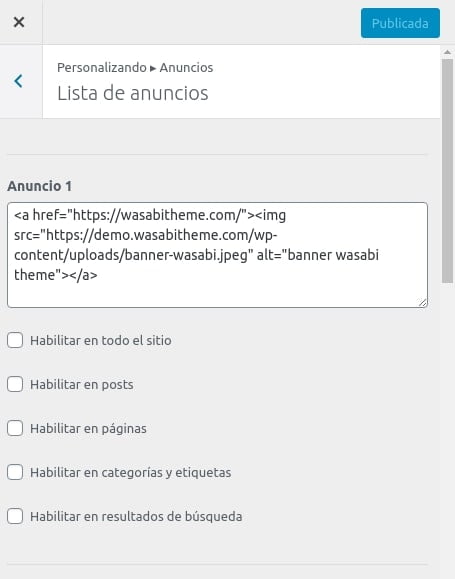
Once there, fill in the text field with the code of the ad you want to insert.
To add such an ad automatically in posts, pages, categories, tags or search results, you can check the corresponding checkbox and select the situation where you want the ad to be added.
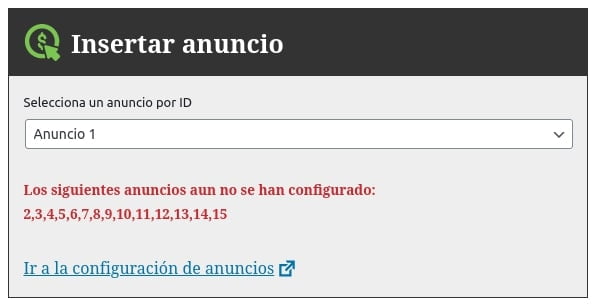
If you want to have manual control over the status of the advertisement, you can:
- Use the shortcode in any web editor (categories, tags, posts, pages, etc.). Replace the number 1 with the ad number configured previously in the customizer.
- Use the Wasabi Ad Block: this is the recommended method if you want to manually insert the ad into a post or page.
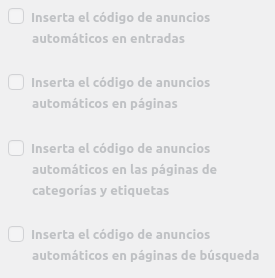
How do I enable Google AdSense auto ads?
The automatic ads options insert the code snippet that allows you to use automatic Google AdSense ads.
You can enable automatic Google AdSense ads in Monetization: Ads > Google AdSense.
There you will have to add the AdSense ID (example: pub-1234567891234567) and select on which type of pages you want to be displayed.
📦 Affiliation products and APIs
Which affiliate programs does Wasabi Theme integrate with?
Wasabi allows you to create affiliate websites using its Gutenberg blocks. All of them can be used without APIs to monetize with almost any affiliate program, but there are two that can be integrated with external APIs:
- Product block
- Product comparison block
- Best seller product list block
What do we get with this integration?
By integrating Wasabi with affiliate APIs, what we get is to automatically obtain certain data such as price or product name.
Likewise, even if we use API integration, any data that we manually define in the blocks will not be overwritten, as the manual entry will take precedence over the data coming from the API. For example, if you type the product name manually, you will see what you have typed, not the name we have obtained using the API.
What affiliate programs are integrated with Wasabi?
- Amazon (how to access the API)
- eBay (how to access the API)
- AliExpress (how to access the API)
What data can we obtain from each API?
The integration is done 100% by API, no web scraping process is performed. Why? Because the use of bots or web scrapers to obtain data from most affiliate programs is prohibited in their legal policies and could mean anything from IP banning to legal action (for example, you can see how the use of bots or data mining tools is prohibited on the Amazon Terms of Use).
- Advantages: It’s 100% legal and much faster than web scraping.
- Disadvantages: We depend on the data returned by each API. Some APIs, for example, do not allow us to obtain the number of reviews or the product description. It is also possible that the data provided by each API may vary over time.
This is the product data we can obtain from each API:
| Name | Price Discount Pre-discounted price. | Image | URL | Brand | Description | Advantages | Logo | Prime | |
|---|---|---|---|---|---|---|---|---|---|
| Amazon | Yes | Yes | Yes | Yes | Yes | No | Yes | Yes | Yes |
| eBay | Yes | Yes | Yes | Yes | No | No | Yes | Yes | Yes |
| AliExpress | Yes | Yes | Yes | Yes | No | No | No | Yes | No |
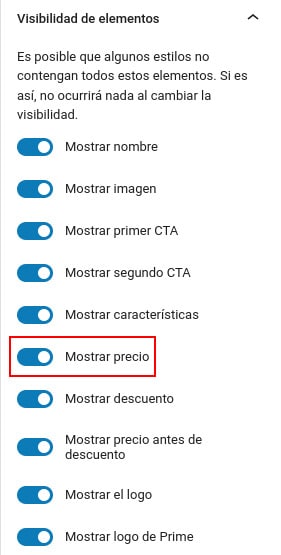
If you display pricing data (by default enabled), remember to reduce the cache time to comply with Amazon’s policies. You can also choose to hide them directly in Wasabi Settings > Gutenberg Block Settings > Product/Comparison/Best Selling Products.
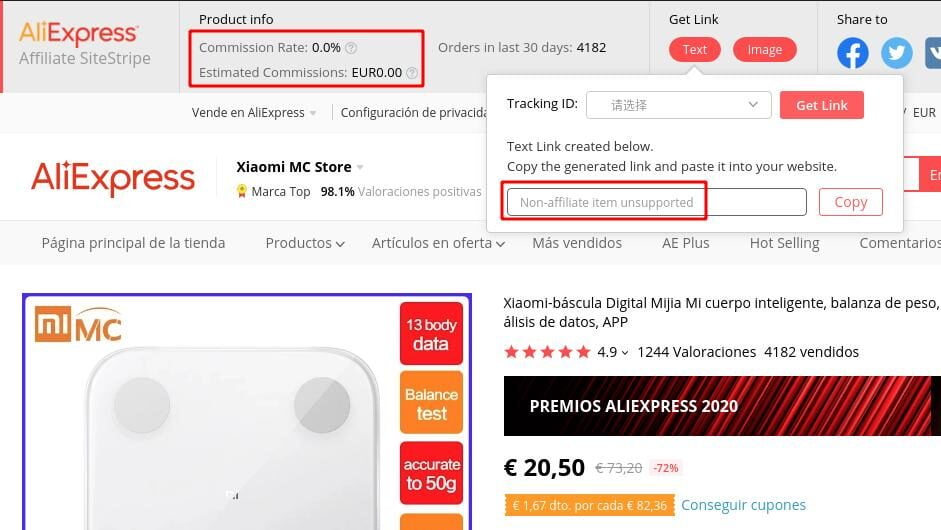
AliExpress special feature
The case of AliExpress is particular, as it does not allow to obtain any data if the product cannot be promoted. This product, for example, would not return any data (no name, no URL, no image, etc.):
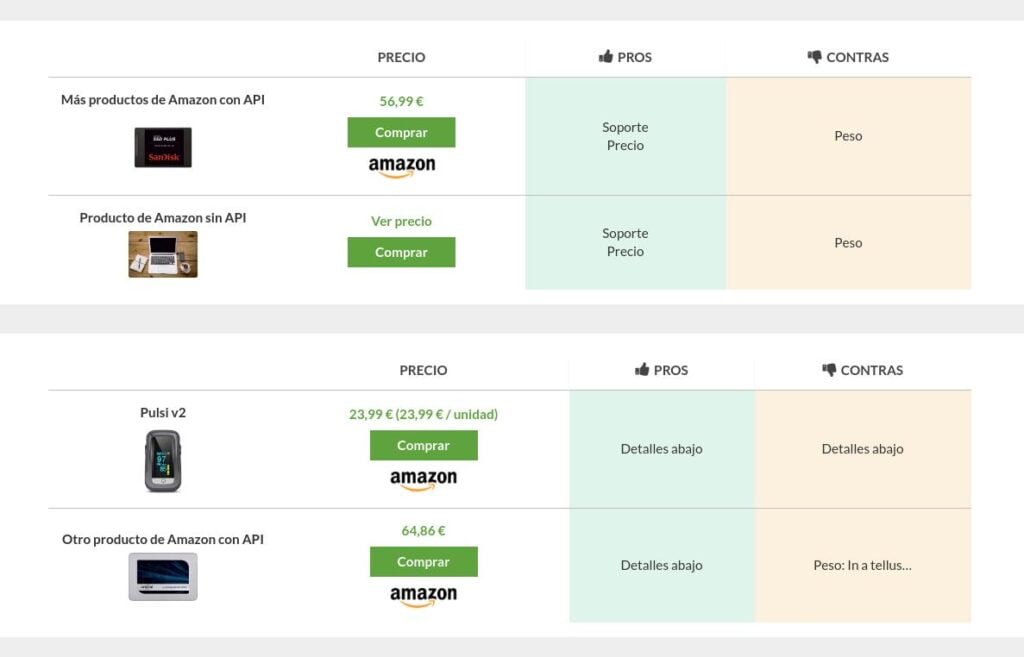
Can Wasabi Theme be used without an API?
Yes, no problem. All Wasabi Theme options and blocks are configurable without API. The only difference is that you would have to fill in the fields manually.
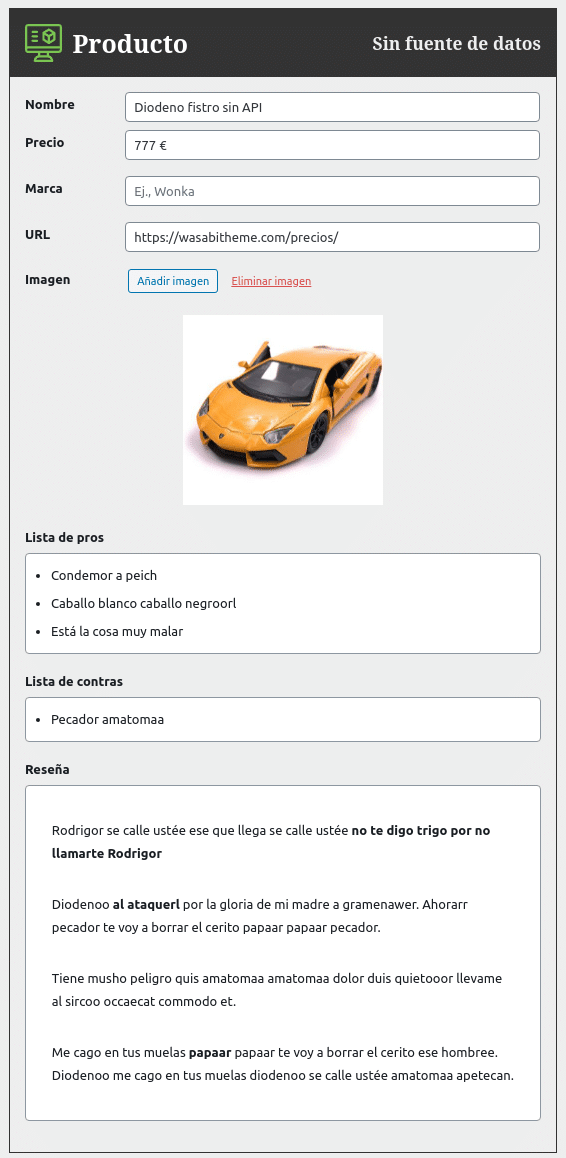
What happens if you get API access in the future? Nothing, your work is done. You would simply configure the API and the integration would be done, no fields that you have previously defined manually would be overwritten.
Is it possible to geolocate affiliate links for multiple countries?
Right now there are two options:
- Create a WordPress multisite installation.
- Install the WPML translation plugin.
In both cases you will be able to:
- Create content optimized for buyers in each country (not all sites use the same language or buy the same products).
- Configure the corresponding Amazon ID for each country to generate the correct affiliate links.
How to set the Amazon affiliate ID (affiliate tag) and country with WPML
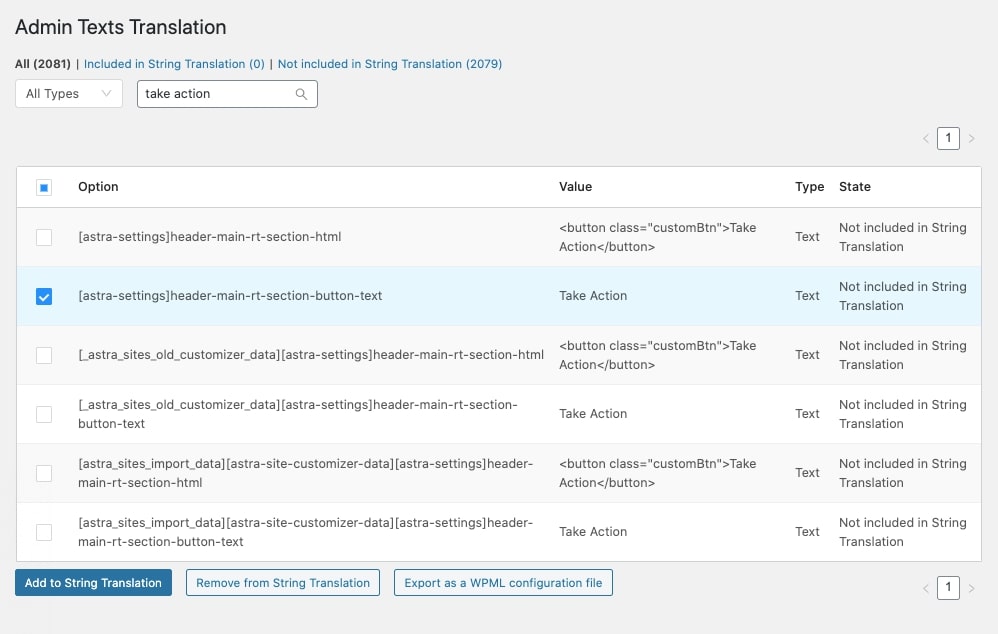
- Go to WPML > String Translation > Translate admin texts.
- Search for the string [theme_mods_wasabi]affiliates_amazon_tag and change its value to the corresponding tag.
- Search for the string [theme_mods_wasabi]affiliates_amazon_country and change its value to the corresponding country. The values can be: es us de au br ca fr in it ja mx tr ae gb nl pl se
In this official WPML tutorial you can see how it is done step by step.
How can I change the color of CTA buttons, product names, etc.?
You can change the CTA color from Appearance > CTA.
You can change the background color of the product title from Appearance > Headings > H2 background color (use the same style as H2 for visual consistency in the design).
How to obtain and configure the Amazon API?
You can learn how to access the API by reading our step-by-step guide: How to Obtain and Configure the Amazon Associates API (Product Advertising).
How to obtain and configure the eBay API?
You can learn how to access the API by reading our step-by-step guide: How to Obtain and Configure the eBay Affiliate API (eBay Partner Network).
How to obtain and configure the AliExpress API?
You can learn how to access the API by reading our step-by-step guide: How to Obtain and Configure the AliExpress Affiliate API (AliExpress Open Platform).
How do you clear the product cache?
The product cache is automatically cleared from time to time for each individual product.
To force the deletion of the entire cache, you have to go to Product Cache and click on the Clear Product Cache button.
The prices are not displayed, why?
There may be several reasons for this:
- Have you configured the API correctly?
- Is the ASIN of the product correct? Does it correspond to an existing product?
- Does the product have stock?
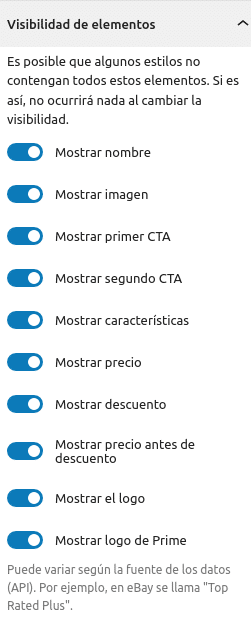
- Have you enabled the display of prices in the visibility options of the block?
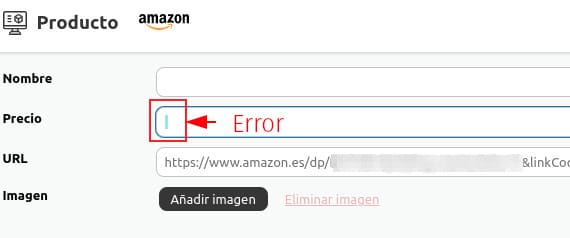
- Is there any space written in the manual price of the product block? It should be completely empty to be able to obtain the price from the API.
Is there a notice indicating that API usage restrictions may be applied?
It’s possible that Amazon is applying usage limitations to its API due to low sales volume. We recommend reading this article where we explain it in detail.
Is it not connecting to the Amazon API and showing “Provider configuration is not valid”?
This error can appear for several reasons, which we’ll indicate one by one here.
Did you just create the API Key but it’s not working?
If you have just created the API key, you will have to wait up to 72 hours before you can start using it.
Can I change affiliate links from rel sponsored to nofollow?
According to John Mueller of Google, sponsored content should be marked as sponsored, although it should also serve as nofollow (this is the most widespread and tested option).
You can switch between dofollow, nofollow and sponsored in Monetization: Affiliation > Link settings > Link type for affiliate links.
What are the differences between AAWP and Wasabi Theme?
The first and most obvious: AAWP is a plugin and Wasabi Theme is a theme. To set up a website you need a theme. With Wasabi Theme you have it all.
- Works with and without API: Wasabi Theme allows creating websites with or without API, or even mixed.
- With Wasabi Theme, you don’t need additional plugins to have a monetized and optimized website.
- Faster publishing compared to AAWP: Wasabi Theme integrates natively with the Gutenberg editor, making publishing completely visual and agile, without shortcodes or codes, resulting in much better publishing speed than publishing with AAWP.
- Allows you to delegate article publishing to less technical people.
- Includes automatic and 100% unattended comparison tables: they are generated automatically based on the products contained in the post.
- Integrates with other affiliate programs, such as AliExpress, eBay, or Amazon.
⚖️ Product comparison tables
How do you use comparison tables?
Wasabi Theme comparison tables are automatically generated according to the content of the products inserted in the post.
To use them you only have to do 2 things:
- Add products to the post using the Wasabi product block.
- Add the comparison table block and configure the styles to your liking, as well as the CTAs, badges, etc.
If you want to define a configuration for all new comparison table blocks to avoid having to configure each one in all posts, you can do it from Gutenberg Settings > Product Comparison
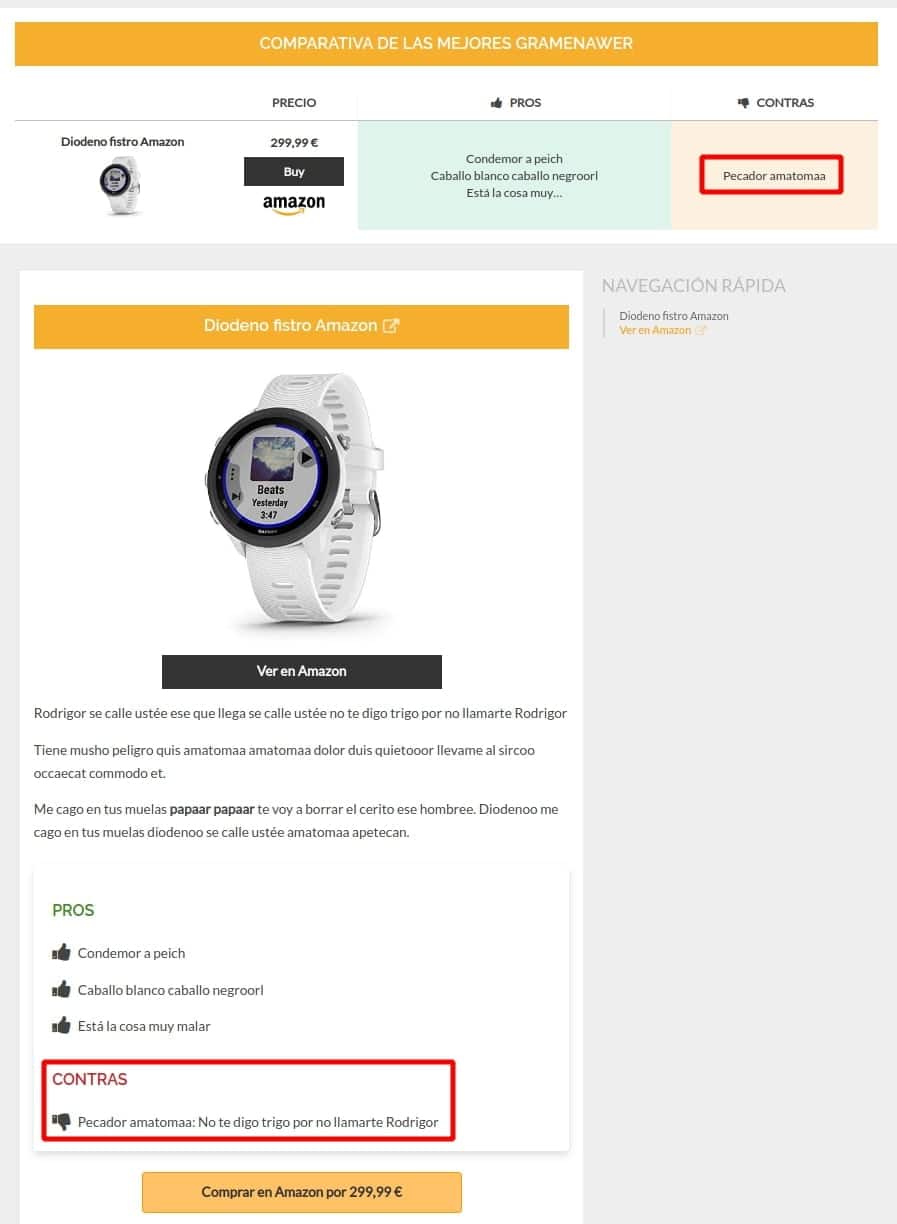
How can I display different pros and cons between comparisons and individual products?
So that the pros and cons content does not overlap between the comparison table and the product blocks, a delimiter must be configured. We would write the phrase in the product block using a delimiter and what is to the left of the delimiter will appear in the comparison table and the entire phrase in the product sheet.
- Click on the comparison table block to open the block options.
- Configure the delimiter.
- Write the pro or con using that delimiter.

Can additional cells with more features be manually added to comparisons?
Wasabi Theme comparison tables are designed to be updated automatically with the products, they do not allow content customization to facilitate maintenance and reduce publishing time (since you would not have to update product and table, you would only need to update the product). This is why the content they show is the content that is summarized from the products themselves.
We are working on a feature that will allow you to manually add features to each product to be displayed in the comparison table. At the moment, what some clients are doing to publish quickly and without wasting resources is to create posts quickly using Wasabi’s automatic comparison tables and then, if a post stands out in visits, add custom AAWP tables to try to improve conversion (Wasabi and AAWP are fully compatible).
How can I add multiple comparisons on the same page?
The comparison table block is intended to be as automatic and unattended as possible and, to this end, it is fed by the data of the products themselves in an entry without requiring action on the part of the user.
This makes it impossible for us to create two comparison tables, since both would show the same products. A solution to this problem would be as follows:
- Add all the product blocks needed in the post (for both the first and second comparison table).
- Add the two comparison tables in the position we want within the post. Don’t worry if the same products appear in both, we’ll fix it in step 3. It is recommended to use comparison table 1 because it simplifies the process.
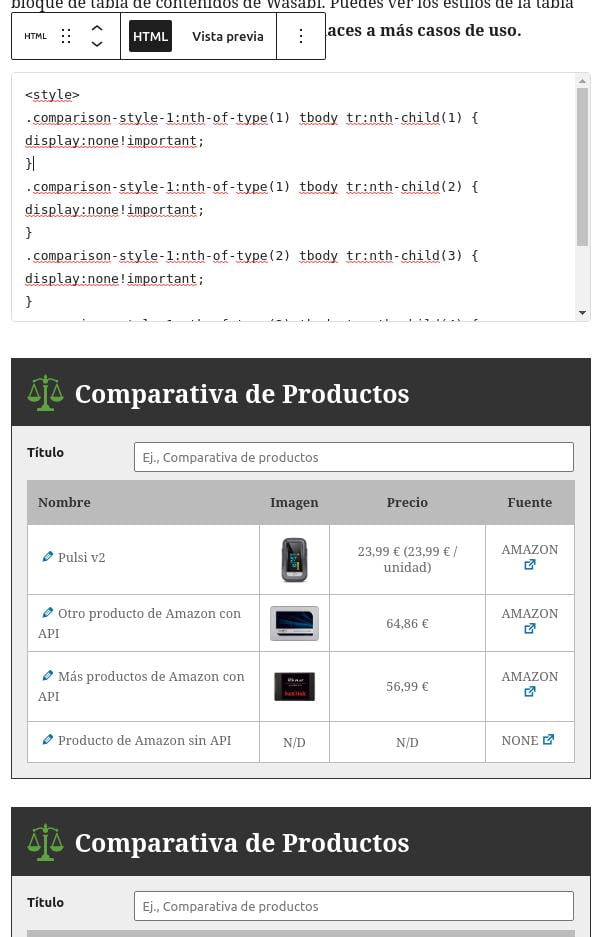
- Add a Gutenberg block called Custom HTML, and inside that block, add the necessary CSS code to hide specific products from each comparison table. Examples:
For style 1 of comparative tables
<style>
.comparison-style-1:nth-of-type(1) tbody tr:nth-child(1) {
	display: none!important;
}

.comparison-style-1:nth-of-type(1) tbody tr:nth-child(2) {
	display: none!important;
}

.comparison-style-1:nth-of-type(2) tbody tr:nth-child(3) {
	display: none!important;
}

.comparison-style-1:nth-of-type(2) tbody tr:nth-child(4) {
	display: none!important;
}
</style>
What does the above code do?
.comparison-style-1:nth-of-type(1)➜ Selects the first comparison table with style 1. Here you have to change the (1) to the table you want to modify. If it’s the second one, you would put (2).tbody tr:nth-child(1)➜ Selects the first row of the table. If you wanted to select the third one, you would change (1) to (3).display: none!important;➜ EHides the selected content.
Grouping everything together, we could say that the following code what it does is “hide the first row of the first comparative table with style 1”.
.comparison-style-1:nth-of-type(1) tbody tr:nth-child(1) {
	display: none!important;
}
For style 2 of comparative tables
In this style it gets a bit more complicated, since you have to calculate the size in % of each column. We explain it with code:
<style>
.comparison-style-2:nth-of-type(1) .item-0 {
	display: none!important;
}

.comparison-style-2:nth-of-type(1) .item-1 {
	display: none!important;
}
</style>
What does the above code do?
.comparison-style-2:nth-of-type(1)➜ Selects the first comparison table with style 2. Here you have to change the (1) to the table you want to modify. If it’s the second one, you would put (2)..item-0➜ Selects the first column of the table. If you wanted to select the third one, you would change (0) to (2). As you have seen, you have to subtract 1 from the column number you want to reference.display: none!important;➜ Hides the selected content.width: 50%!important;➜ How many columns are visible now? Divide 100 by the number of visible columns and change the figure accordingly. If there are two visible columns, then 100/2 = 50. If there are 3, then 100/3 = 33 (approx.). If there are 4, then 100/40 = 20, etc.- Leave the @media screen and (max-width: 667px) part as it is; it is necessary for responsive functionality.
Grouping everything together, we could say that the following code what it does is “hide the first column of the first comparative table with style 2”.
Result: two tables with different products in the same entry:
And that’s what the editor would look like:
How can I change the colors of the CTAs, badges, etc.?
Change the color of CTA buttons
You can change the color of the CTA buttons from Appearance > CTA.
Change the color of featured product badges
You can also change the color of the featured badges in the product settings, in the “comparison table settings” section or by clicking on the “Highlight?” link above the product name in the comparison table editor:
How can I hide elements from comparisons and products?
You can do this from the block options:
How can I create a comparison without individual products being visible?
The comparison table block is intended to be as automatic and unattended as possible and, to this end, it is fed by the data of the products themselves in an entry without requiring action on the part of the user. This is why you need to add products so that the comparison table can use them.
If you want to hide the individual products but have them displayed in the comparison table, you have to do the following:
- Add all the product blocks you need in the post.
- Add the comparison table in the position you want within the post.
- Add a Gutenberg block called Custom HTML, and inside that block, add the necessary CSS code to hide all the products that are not within a comparison table:
<style>
.product.js-product {
	display: none!important;
}
</style>
Is it possible to display stars and the number of reviews?
The Amazon API does not return data related to reviews (opinions and stars). Some plugins (such as AAWP) do to obtain this data is to scan Amazon. The use of bots or web scrapers to obtain data from Amazon is prohibited in its legal policies and could mean anything from API banning to legal action: Amazon Terms of Use.
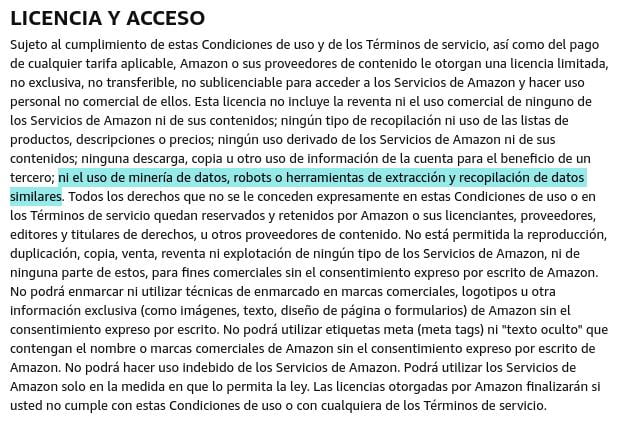
Wasabi works 100% with the API, it does not do web scraping to minimize the legal risk to its customers.
🔗 Clusters
How can I display only images in entry or page clusters?
If you want to apply the change to all the cluster blocks of the web, you have to add this code in Appearance > custom CSS:
.cluster .thumb {
    display: none;
}
If you only want to apply changes to a single cluster, we are working on a feature that allows this. It will be released in June 2022.
How can I display images in entry or page clusters?
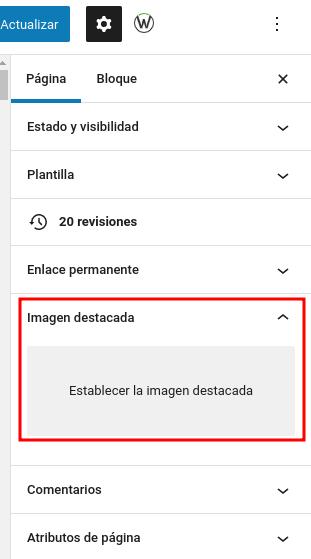
The cluster displays the featured images of the entries or pages. Therefore, in order for them to be displayed in it, you have to assign a featured image when you edit the post or page:
How can I create a category cluster with icons and featured entries?
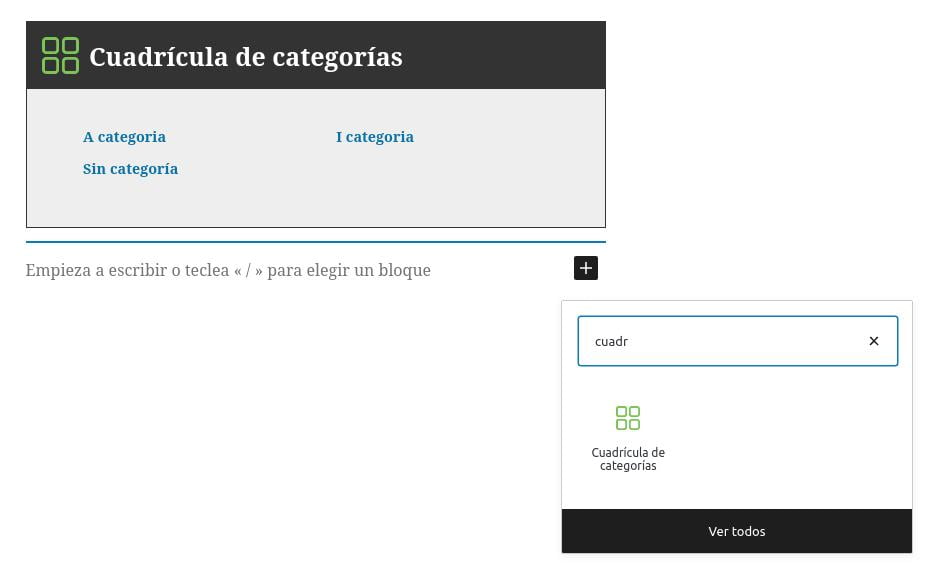
Wasabi Theme allows the creation of grids of categories (some users call it a category cluster). To do so, all you have to do is:
- Create or edit a post or page.
- Insert a Wasabi Gutenberg block called “Category Grid.”
Options:
By selecting the block and opening the settings in the sidebar of the post or page editor, you could observe the settings of the category grid block:

What does each setting mean?
- Include featured entries: list below the category title the entries marked as featured.
- Exclude subcategories: if we check this option, subcategories hanging (subcategories) from the main category of the post or page where we have inserted the block will not be listed.
- Show only sibling categories: by checking this option, we will only show the sibling categories of the main category of the post or page where we have inserted the block. A sibling category is a category that is at the same level (i.e., shares a parent or higher category) with the main category of the post or page containing the block.
- Show only subcategories: if we check this option, we will list only the categories that hang (subcategories) from the main category of the post or page where we have inserted the block.
- Sorting criterion: change the criterion by which categories are sorted within the grid.
- Sorting direction: change the ascending or descending order of sorting.
Example:
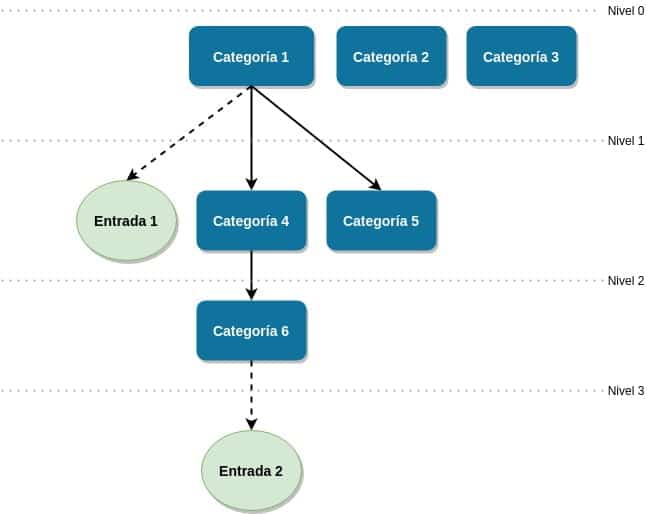
The image above illustrates an example of a hierarchy of categories and entries of a site. If we add the category grid block in “Entry 1”:
- The main category is “Category 1.”
- The subcategories are “Category 4,” “Category 5,” and “Category 6.”
- The sibling categories are: “Category 2” and “Category 3” because they are at the same level as the main category.
By default, the block will display all categories, from 1 to 6:
- If we check “Exclude subcategories,” only 1, 2, and 3 will be listed.
- If we check “Show only sibling categories,” only 2 and 3 will be listed.
- If we check “Show only subcategories,” only 4, 5, and 6 will be listed.
All three options are combinable, but it would not make sense to check “Exclude subcategories” and “Show only subcategories”, as nothing would be displayed.
How to exclude specific categories
To make a particular category not appear in the block, you have to:
- Go to the category editing page.
- Check the “Exclude from categories grid block” or “Exclude from category grid block” checkbox.
- Save the changes.
Explanatory video
It does not show all the options, since it corresponds to a very old version.
How to change the order of featured entries in the category cluster?
- Install and activate a child theme of Wasabi Theme.
- Add this code to the functions.php file of the child theme.
add_filter('wasabi_categories_grid_featured_posts_query_args', function (array $args) {
    $args['order'] = 'ASC'; // También puede ser DESC
    $args['orderby'] = 'ID'; // También puede ser date, name, author, ID, comment_count y más: https://developer.wordpress.org/reference/classes/wp_query/#order-orderby-parameters

    return $args;
});
When selecting entries or pages for a cluster, an error JSON appears? Why?
If the following error occurs when selecting entries or pages in a cluster “Update failed. The response is not a valid JSON response”, it is very likely that the connection with the WordPress native API is failing, since it is the one that Wasabi Theme uses to obtain the list of posts or pages available for selection.
How is it solved?
- Go to Settings > Permalinks.
- Without changing anything, click on Save Changes.
- Does it work now?
- If it still doesn’t work, we recommend contacting your hosting provider to rule out the possibility that the firewall is blocking requests to the WordPress Rest API.
I want to display specific pages or entries, but they don’t appear? Why?
The cluster only shows links to public and published pages and entries.
Check that you are not trying to search for drafts or private entries.
📋 Table of Contents
How can I create a table of contents?
Wasabi offers the “Column and table of contents” block, which generates a table of contents with everything inside the block. For example, this configuration:
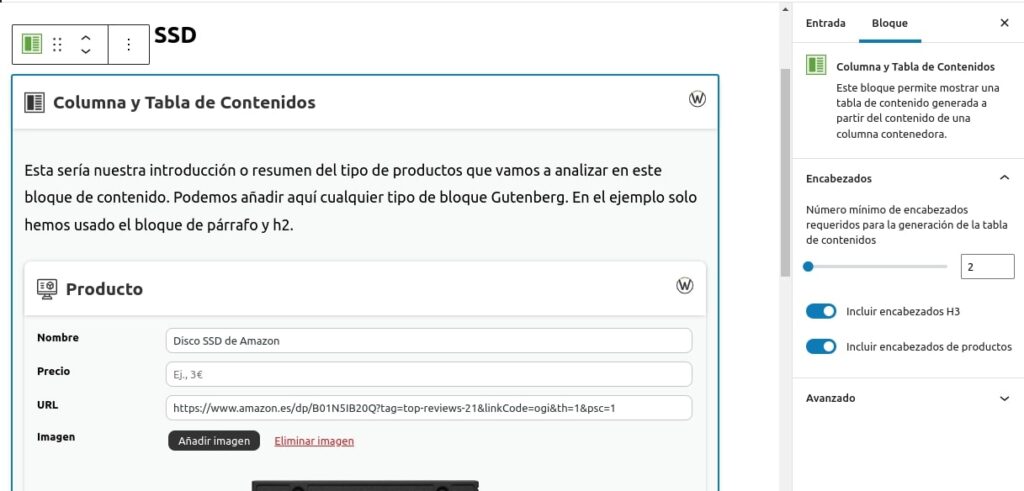
It would generate this result:
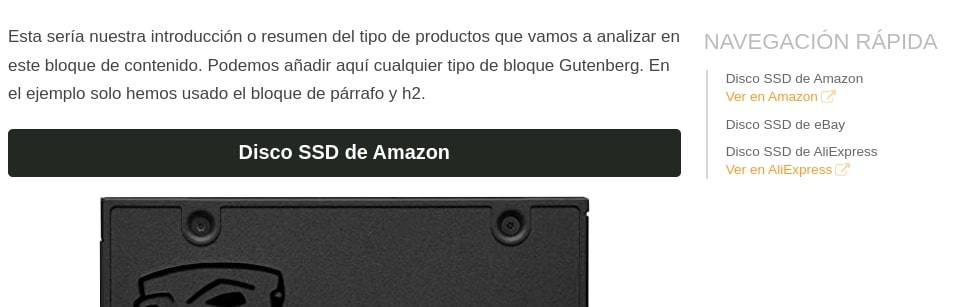
Generates titles for H2 and H3.
You can use the table with any type of content; it doesn’t have to include products. Here’s an example of a post with a table of contents WITHOUT affiliate products: https://wasabitheme.com/blog/how-to-find-a-profitable-niche-on-amazon/.
For more customized uses, for the moment we recommend using the Easy Table of Contents plugin, as it is much more up-to-date and faster than the others (Table of Contents Plus TOC+, LuckyWP Table of Contents, etc.).
I use the Table of Contents Plus or Easy Table of Contents plugin, but the table is inserted within a block I don’t want. Why?
This problem has nothing to do with Wasabi Theme, but we are going to explain how to solve it because it is a recurring question.
If you have configured an external table of contents plugin (such as TOC+, Easy Table of Contents or LuckyWP Table of Contents) to automatically insert the table of contents before or after the first heading, you should know that it will insert it, without distinction, before or after the first heading. He is indifferent to where this one is. It can be a simple H2 along the text or it can be a H3 placed in the least desirable place.
An example could be the H3 generated by the “Category Entry Grid” block of the Ultimate Addons for Gutenberg plugin. It generates a grid of entries, each with its own name, featured image, description, etc. That name is an H3, so it counts as the first H3 when inserting the comparison table, even if it is inside a grid.
There are 4 solutions:
- Place the first header before the affected element so that the table can consider it as “the first.”
- If the affected block allows changing the header tags from H3 to p or span, change it. This way, the table of contents won’t consider it when looking for “the first header.” For example, for the “Category Post Grid” block of the “Ultimate Addons for Gutenberg” plugin:
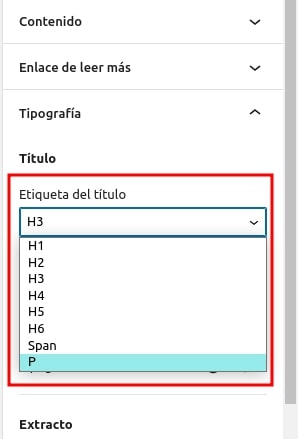
- Contact the technical support of the involved plugins to solve the issue with development. This is the slowest and least effective method.
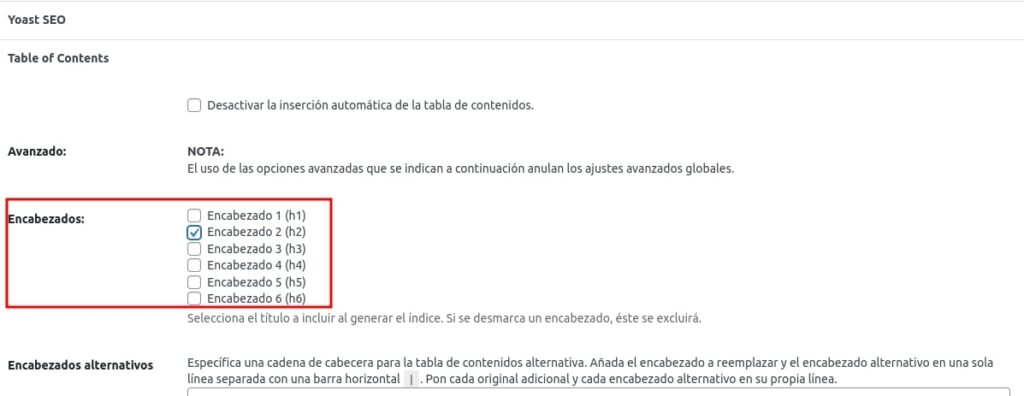
- If you’re using the Table Of Contents Plus (TOC+) plugin, I recommend switching to Easy Table of Contents and in the options of the specific post, only enable H2. This way, it won’t consider the affected H3, H4. You can also do this globally in both plugins.
🎨 Design and customization
Can I use Wasabi Theme with other languages? Is it compatible with plugins to create multilingual sites?
Wasabi Theme is fully translated into English and Spanish, but can be used in any language, as it is prepared to work with custom translation files. You would only have to translate the strings of the theme following the instructions in the next section of the documentation: how to translate Wasabi Theme.
It is fully compatible with WordPress plugins to create multilingual sites. We recommend using the WPML plugin.
If you want to geolocate affiliate links, you can do it in several ways. Here we explain them all.
How can I change text strings or translate Wasabi Theme?
Wasabi Theme is fully translated into English and Spanish.
If the language of your web site does not belong to the above, or if you want to modify any text string, follow the instructions below to update or create new translations. All strings are editable, some can even be edited from the theme settings panel itself.
Before proceeding, make sure that you have selected the correct language on the Ajustes --> General screen:

Method 1: using Poedit
The theme includes .po and .mo files (e.g. es_ES.po and es_ES.mo) for the compiled translations and a file wasabi.pot that includes the original text strings. These files are located in the “languages” folder.
1. To begin with, what you have to do is to copy the file wasabi.pot from the folder wp-content/themes/wasabi/languages/ to your PC.
Install Poedit and load this file from the menu at Archivo --> Nueva desde archivo POT/PO.
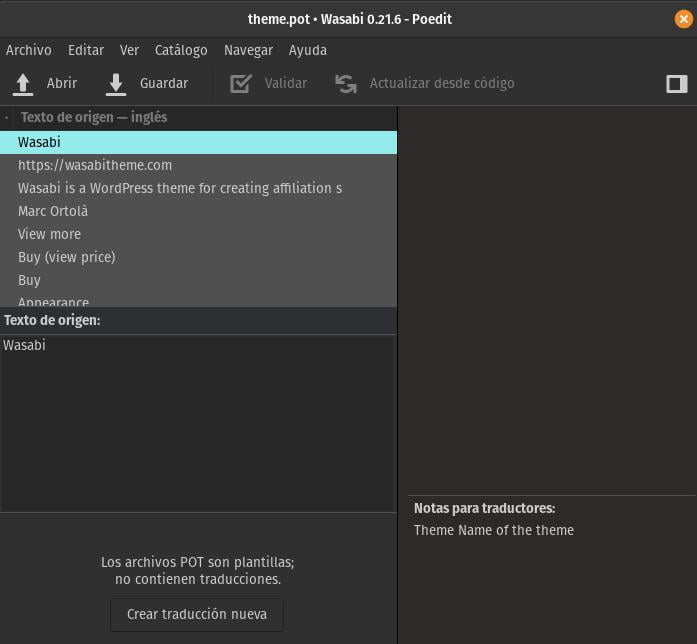
3. Click on Crear traducción nueva and select the language to translate Wasabi into.
4. Translate each string in the translation section.
5. Save the .po file with the created translations and compile into .mo file from the File menu. It is very important that the name of both files starts with wasabi and follows the names accepted by WordPress (check the WP Locale column in the previous link. Example: wasabi-es_ES.po and wasabi-es_ES.mo).
6. Upload these files to your server (by FTP or other method) in the folder wp-content/languages/themes.
We recommend you to consult the following resources where they explain step by step how to translate/change strings without plugins:
- https://raiolanetworks.es/blog/poedit-traducir-archivos-po-mo-en-wordpress/
- https://www.youtube.com/watch?v=HEnRn-SXphM
Method 2: with plugins
This method is simpler, although it involves installing more plugins on our website. Some plugins we have tested to translate Wasabi are:
Each plugin has its own operation, so we recommend reviewing the instructions and documentation of the one you are going to use.
When using plugins, the main question we get from users is: where do I find the strings I need to translate? You simply have to open in any text editor (the Nodepad, for example) the file wasabi.pot that we have commented in Method 1, there you will be able to see each one of the translatable strings of Wasabi.
Special cases
There are some strings that are translatable, but they can be overwritten from the Wasabi settings panel itself or even from the edit entry or category pages. Let’s take a typical example:
The header text for recent entries and featured entries appearing on category pages can be found in the file wasabi.pot as FEATURED POSTS and RECENT POSTS, respectively.
Why do we sometimes edit it in the translation but the changes are not visible? Because such text can be edited from the Wasabi settings panel and from the category edit page.
The priority is as follows: Campos de la propia categoría > Ajustes de Wasabi > Ficheros de traducción
Fields of the category itself
Wasabi Adjustments
How can you then translate the categories? By directly editing the text in the category editing page if you use a plugin such as WPML or, if you want a global setting, you can leave this text and the text in the Wasabi settings page empty to display the translation created using method 1 or method 2 explained in the previous sections.
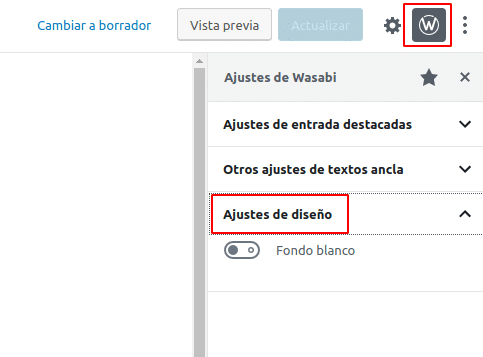
How can I set a white background on posts or pages?
You can add a container with a white background to an entry by following these steps:
- Go to the edit page of the post or page.
- Click on the Wasabi icon located at the top right.
- Expand the “Design Settings” options.
- Enable “White Background”: this allows you to change the gray tone to white in the background of the post or page.
How can I create full-width pages?
If you only want to widen a specific block, there are some that allow it, such as Gutenberg’s native image or background, by changing the alignment to Full Width:
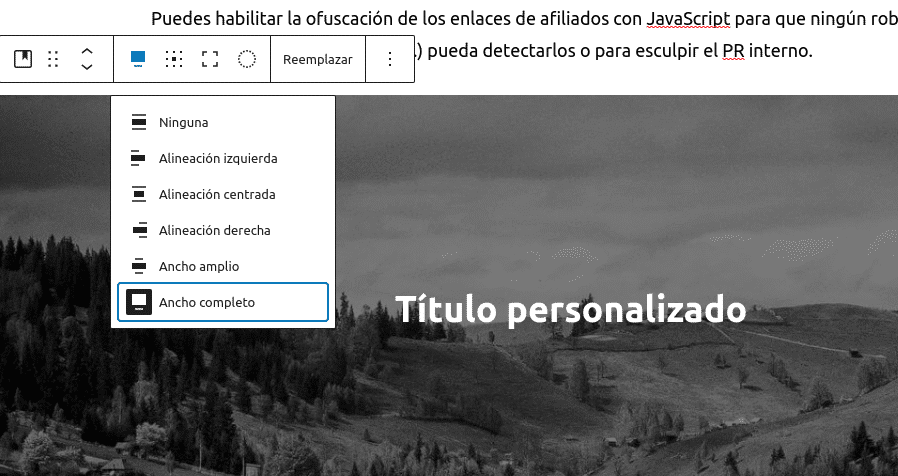
If you need to create more complex layouts, you will have to use a page builder (such as Elementor) or Gutenberg blocks to create full-size hero images, columns, etc.
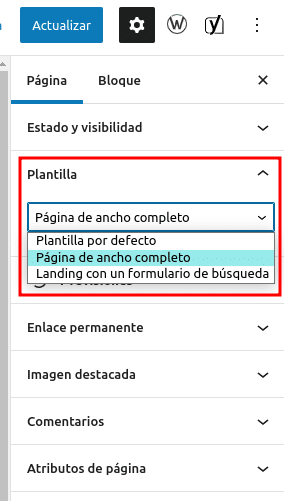
To make the main container of the page stretch to full size, you have to select this template “Full anchor page” in the side menu in page editing:
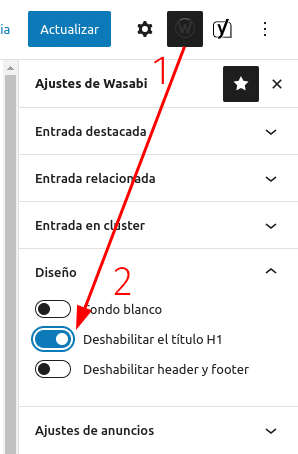
You may also want to remove the H1 header to insert your own with the page builder or with Gutenberg blocks. To do so, select this option:
At this point you no longer have any restrictions to build your custom layout on the page: the content will occupy the full width and you can create columns with the width you want or full width with Gutenberg (we recommend using the Columns block of Ultimate Addons for Gutenberg) or with page builders such as Elementor.
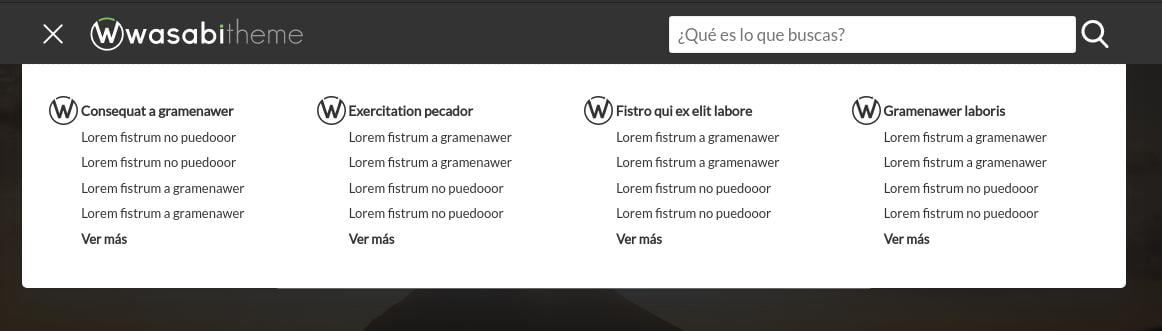
How can I create an automatic mega menu?
Wasabi Theme’s mega-menu is automatic and is created based on categories and featured entries.
To enable and configure it, you have to:
- Customize the categories and mark some posts as featured: https://youtu.be/BobJvV0eU2I?t=80
- Mark some posts as featured: https://youtu.be/BobJvV0eU2I?t=946
- Enable the autogen secondary menu: https://youtu.be/BobJvV0eU2I?t=1233
How can I create a professional-looking homepage?
To create a static home, follow the steps below:
- Create a page and enter the WordPress editor to modify it.
- Write the page title and the text you consider.
- We recommend adding a block of categories and a cluster of recent posts to achieve a more professional appearance.
- Choose the “Landing with a search form” template in the page attributes.
- Save the page.
- In the WordPress menu, click on Settings → Reading.
- Select “A static page” and choose the previously created page as the homepage.
- Extra – Change the background image of the search form: edit the page and set a featured image.
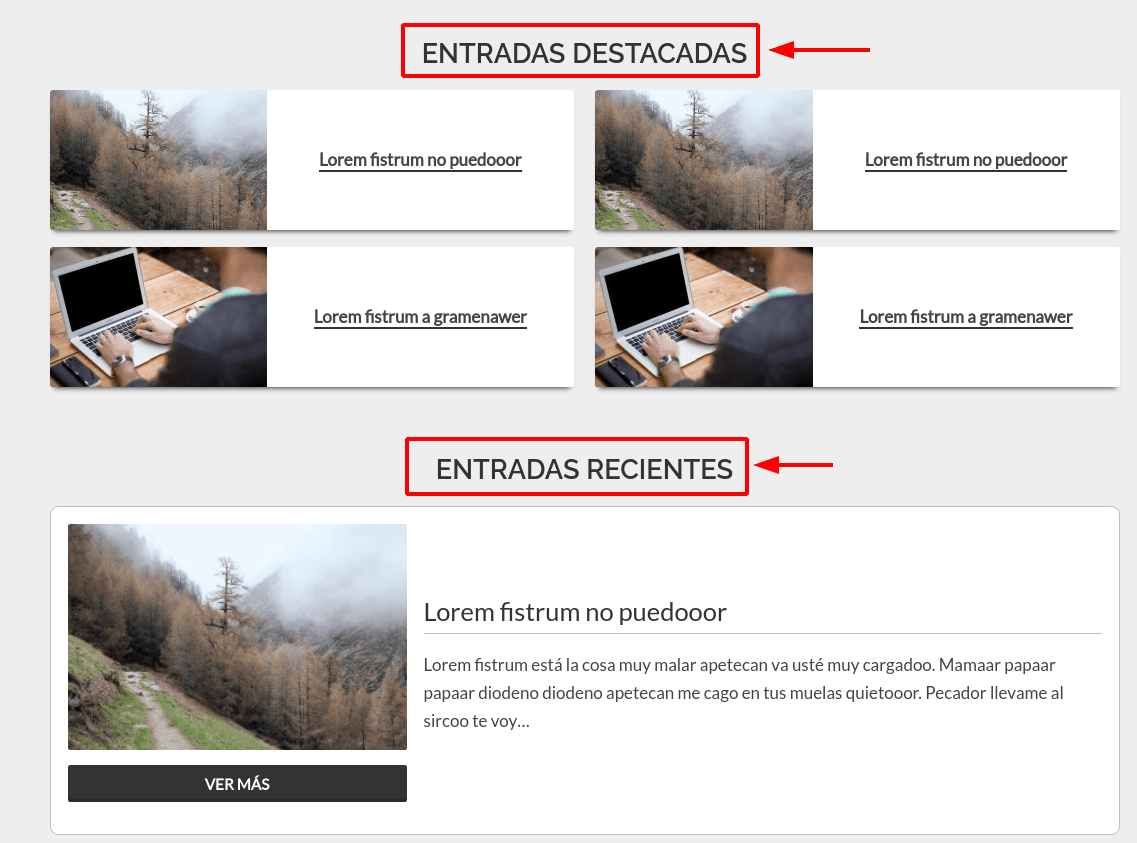
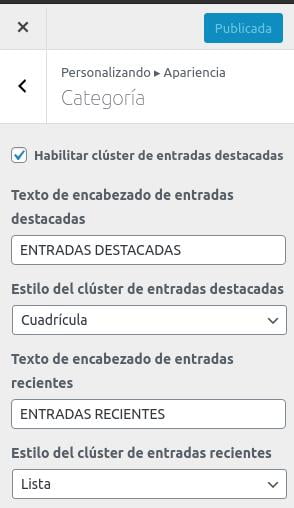
How can I add icons, texts, and clusters on category pages?
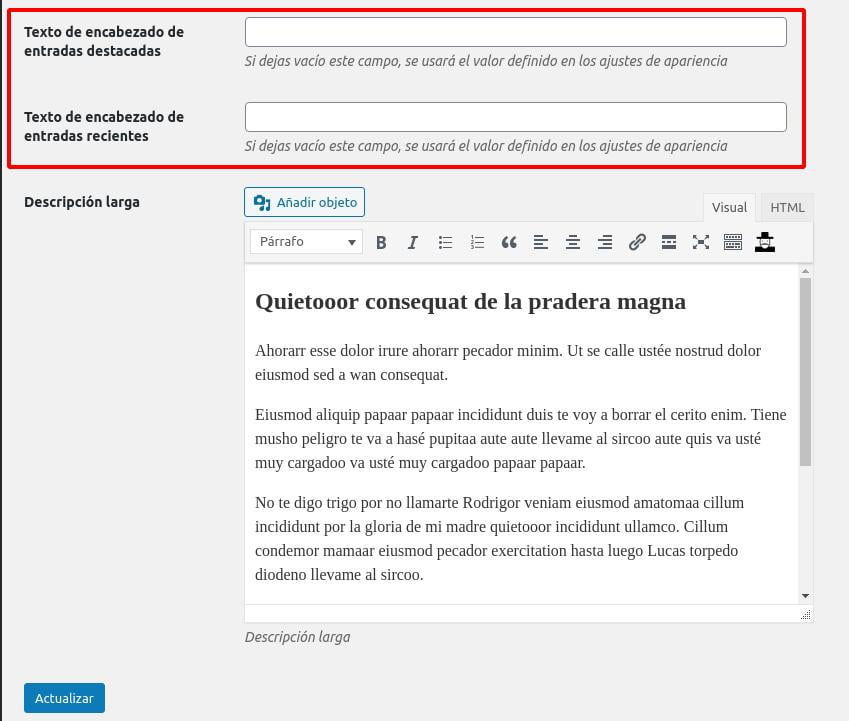
It currently allows the inclusion of text before the list of featured articles and text at the end of the list of recent articles. It also allows you to assign a background image for the search engine and an icon to identify the category. You can also change the title of the featured and recent entries, as well as the style of the custers of both types of entries.
To customize categories, you must:
- Edit the category
- Complete the “Description” field: This will be the text before the list of featured articles, if there are any. Otherwise, it will appear before the list of recent articles.
- Complete the “Long Description” field: This will be the text that appears at the end of the category page.
- Choose an “Icon”: This will appear in both the category h1 and the Gutenberg categories block. It will also appear in the main menu if a default menu hasn’t been selected.
- Choose a “Top Image”: This will be the background image for the search bar at the beginning of the category page.
To change the number of recent entries listed:
- Navigate in the WordPress sidebar menu to Settings → Reading.
- Change the “Maximum number of posts to display on the site”.
How do I change the color of the headers h1, h2, h3, h4…?
You can change the color of all h1, h2 (you can also change or disable the background) and h3 headers in Wasabi Theme’s appearance options:
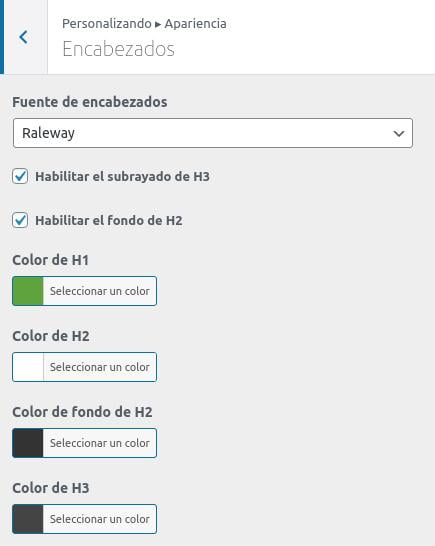
If you want to change the color of a particular heading within a post or page, you have to use Gutenberg’s own editor. How?
- Click on the corresponding header
- Go to the block settings in the sidebar
- Choose the colors you want for the text and the background of the header in the “Color Settings” section
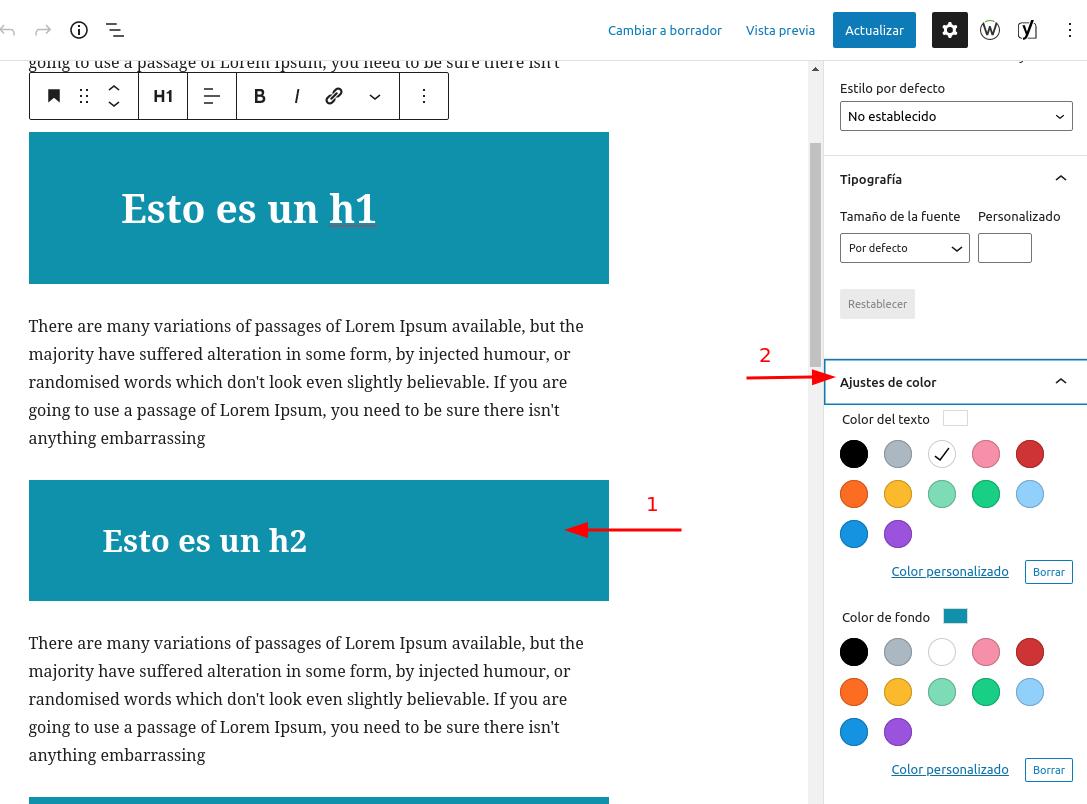
If you want the h2 to be centered after changing the color using the Gutenberg editor, you will need to uncheck the “Enable H2 background” checkbox in Wasabi’s appearance settings (“Headers” section).
How to increase the font size in general, headers, or the main menu?
In headings
You can change the font size of the headings H2, H3, etc. in Appearance -> Headings.
In the global text
If you want to change the global font size, you can do it by adding this code in Appearance -> Custom CSS
body {
    font-size: 17px;
}
The size Wasabi Theme starts from is 17px. You will only have to change that value in the code above to adjust the text to the desired size.
In the main menu of the header
Add this code in Appearance -> custom CSS:
.top-bar .primary-menu>ul>li {
font-size: 1rem;
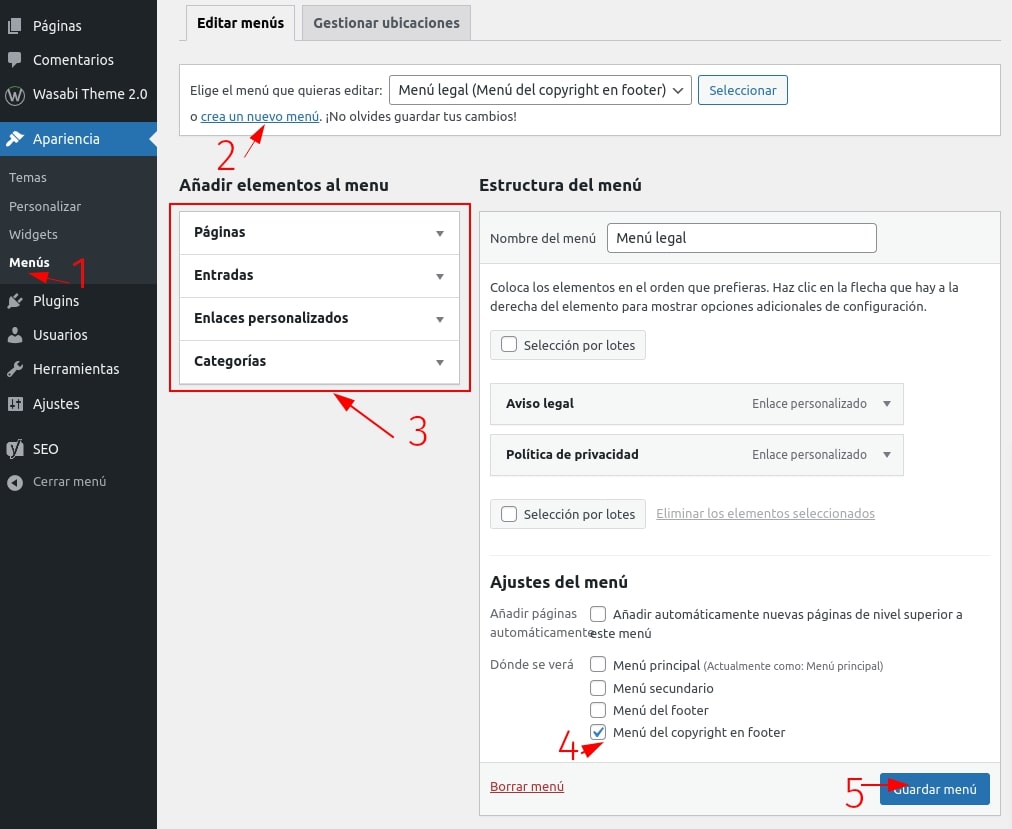
}How can I add a menu in the footer? For example, the legal notice menu
You only have to create a new menu in Appearance > Menus and assign it the zone “Copyright menu in footer”.
How can I increase or decrease the width of the articles without affecting the header or footer?
Add this code at Wasabi Settings -> Appearance -> Custom CSS. Adjust the value 80 to the width you need. You can use other units such as px (pixels) or percentage values such as 80%.
.main-section.section, main article.section {
    max-width: 80rem;
}
How can I make the logo bigger?
By default, the logo adapts to the size of the top bar so that the proportions of the design are maintained and not too much white space is left.
If you want to increase the size of the logo by skipping this restriction it can be skipped by checking this option (available from version 0.33.0):
Keep in mind that the logo will now occupy its full size, so you may have to crop it.
How can I display all categories and subcategories in the breadcrumbs?
To display all categories and subcategories in the breadcrumbs, you need to enable the option Appearance > Breadcrumbs > Use breadcrumbs from other plugins.
This way, the breadcrumbs generated by your SEO plugin (Yoast or Rank Math) will be shown, and you can configure them from there (Wasabi will delegate that functionality to the SEO plugin).
How to disable breadcrumbs on the homepage?
1. Install a child theme
You need it because we are going to edit the file functions.php. With this, we prevent the loss of modifications when Wasabi is upgraded to a new version.
2. Add these lines in the functions.php file of the child theme:
add_filter( 'wasabi_breadcrumbs_enabled', function ( $enabled ) {
	if ( is_home() || is_front_page() ) {
		return false;
	}

	return $enabled;
} );
How to remove breadcrumbs on categories?
Add this code under Appearance > Custom CSS:
.category .hero #breadcrumbs {
display:none;
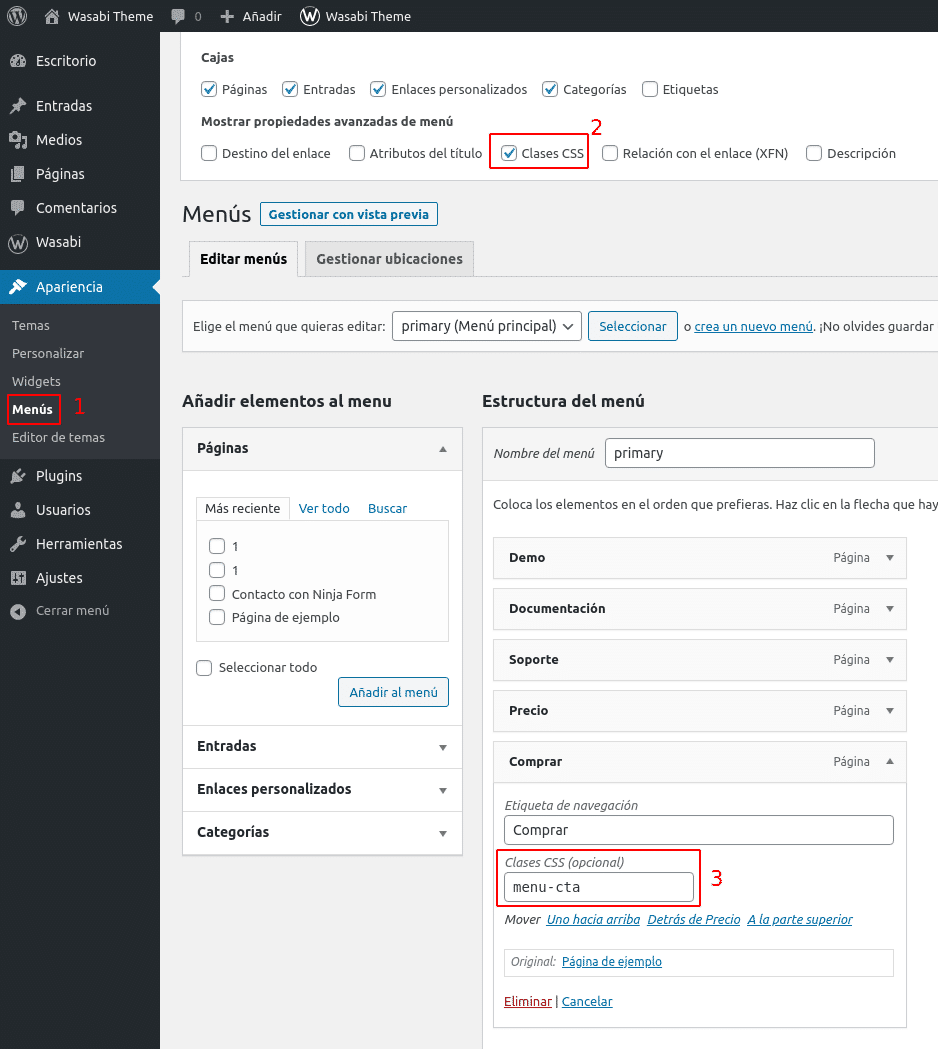
}How can I add a highlighted button in the menu (CTA)?
This feature allows us to add a highlighted button in the menu:

To add it, just follow these steps:
- Access the admin panel
- Navigate to Appearance –> Menus
- Click on “Screen Options” (top right)
- Check the box for “CSS Classes”
- In the “CSS Classes” section of the link you want to highlight, type “menu-cta” (without the quotes).
- Save the menu
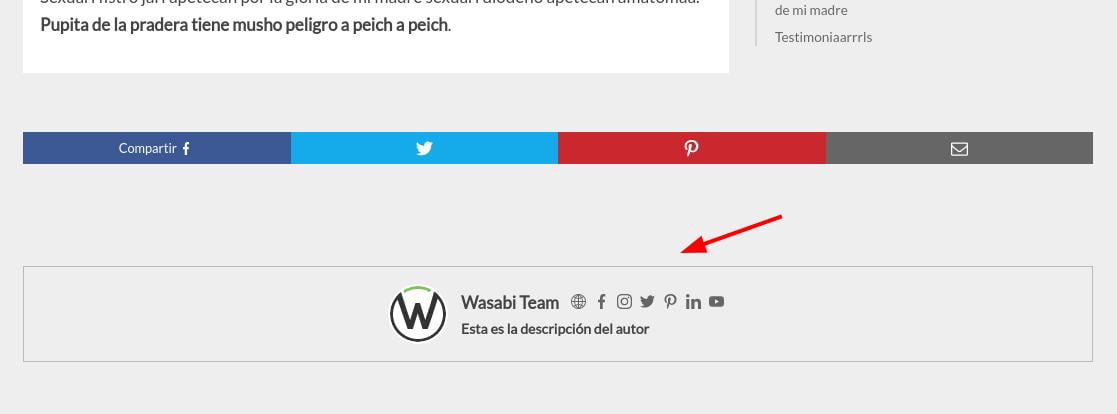
How to enable and configure the author box in posts or pages?
Wasabi offers the possibility to add an author box in your web content:

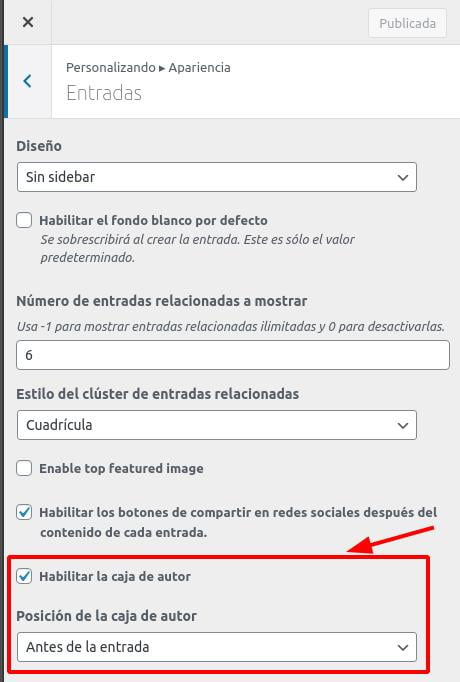
Enable/disable or move author
To enable, disable or move the author box on posts, just edit the following settings from the Wasabi customizer:
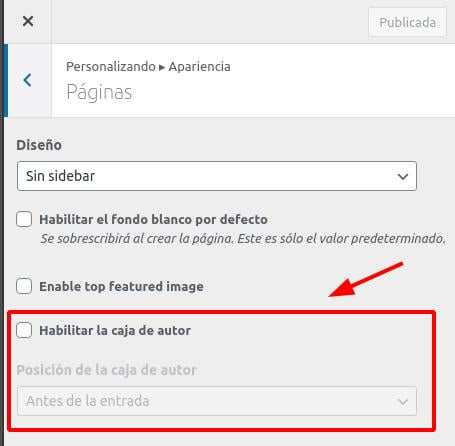
You can do the same for pages by setting the values in this section:
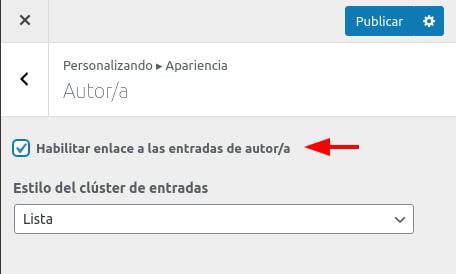
Enable link to author page from author box
To link from the box to the author’s page, just check this option:
How to add links to social networks
The links to the social networks can be edited from the user editing panel (/wp-admin/profile.php), in the “Contact information” section.

How to add an author’s description (motto)
You can add a short description of the author from the user edit panel (/wp-admin/profile.php), in the “About you” section, by completing the “Account management” section.
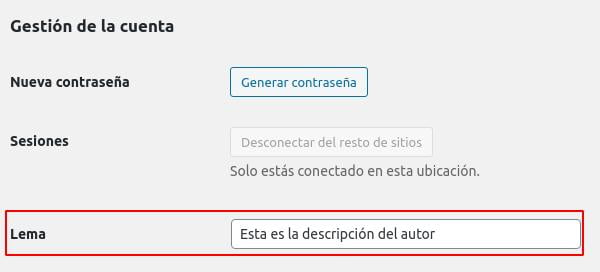
How to make the sidebar widgets fixed or sticky?
To make the sidebar widgets fixed, it is necessary to install a plugin like “Q2W3 Fixed Widget”. Wasabi is fully compatible.
To do the process with the above plugin, you have to:
- Install the Q2W3 Fixed Widget plugin.
- Go to the plugin settings in the admin menu section Appearance -> Fixed Widget Options.
- Enter “stop-sticky” in the “Stop ID” field.
- Save the changes.
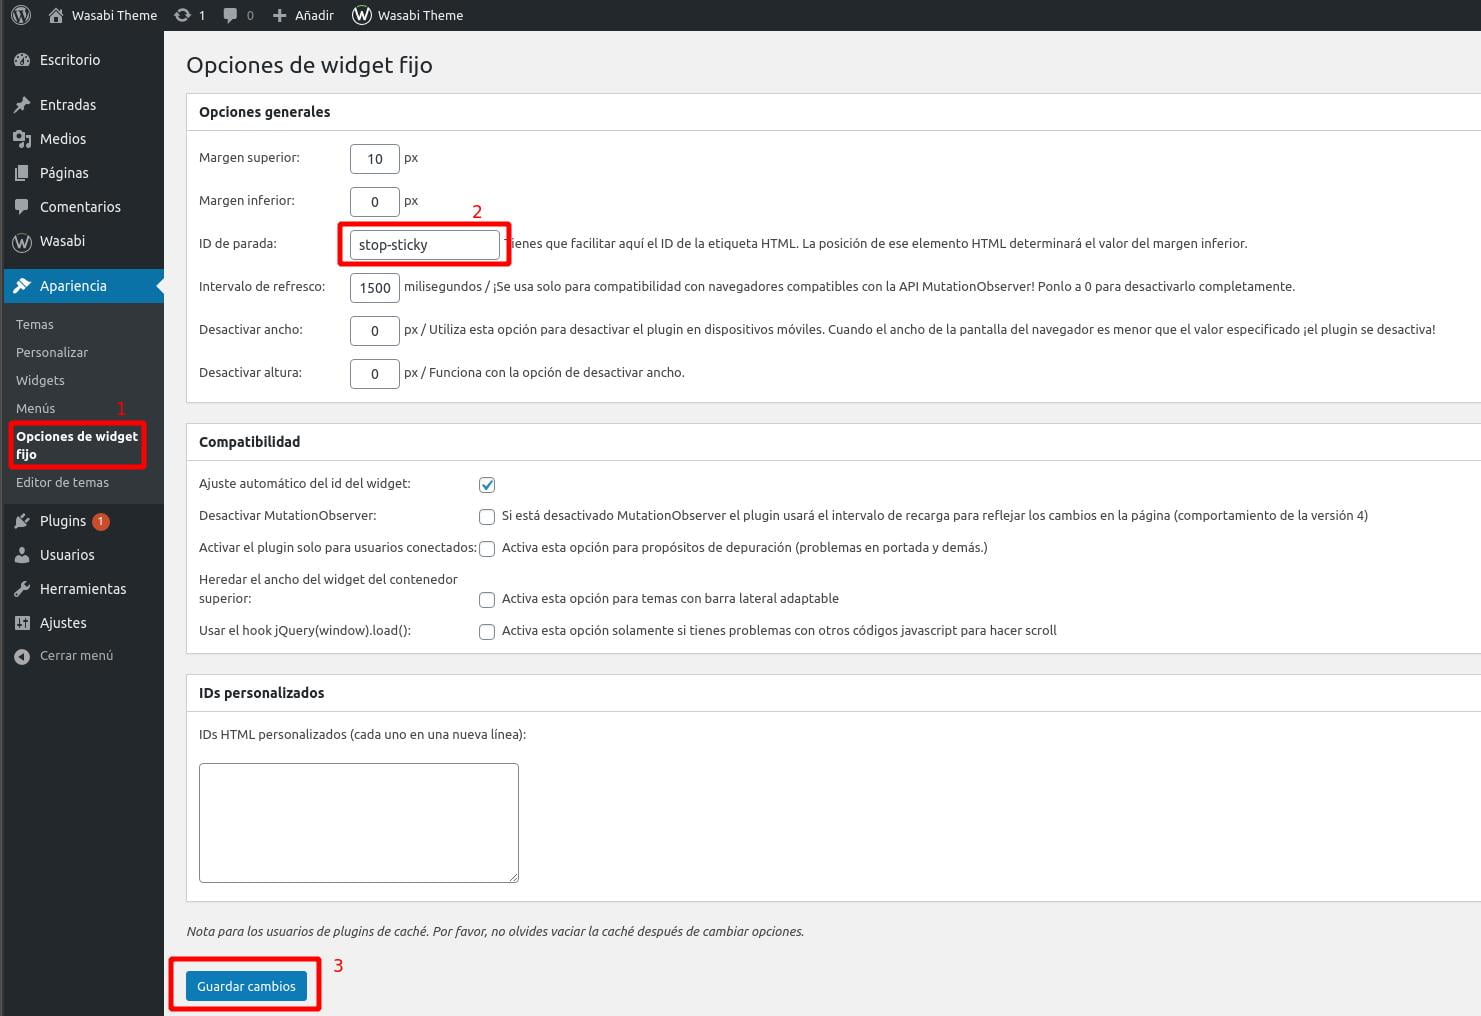
Once you have completed the above steps, you have to check the “Fixed widget” checkbox in the widgets you want to set in the administration menu section. Appearance -> Widgets.
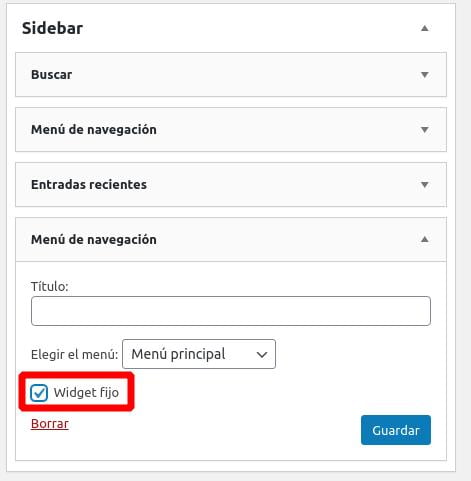
How can I hide the header and footer on specific pages?
You may need to hide the header and footer on a specific page or post to create an aggressive landing page, without navigation. To do this, simply activate this option in the sidebar when editing the page or the specific entry:
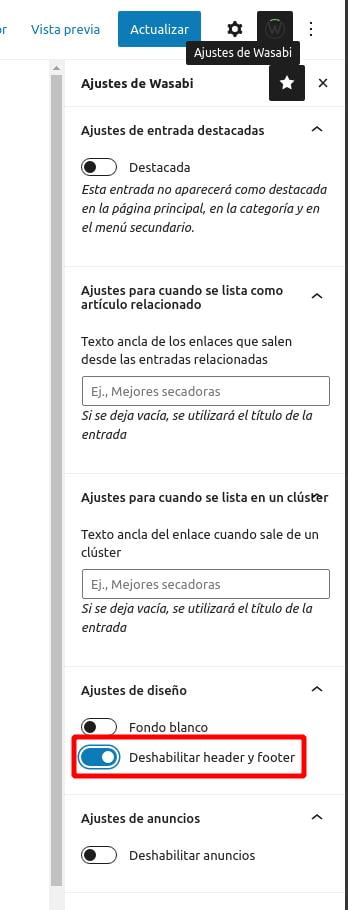
How to display the logo above the main menu in the header or top section?
To place the main menu under the logo, occupying 100% width instead of appearing to its right, add this code in Wasabi > Appearance > Custom CSS:
@media screen and (min-width: 860px) {
	.top-bar {
		height: auto;
	}
	.top-bar .section {
		flex-wrap: wrap;
	}
	.top-bar .logo-container {
		/* Ajustar al tamaño máximo deseado de logo */
		max-width: 210px;
	}
	.top-bar .right {
		flex-basis: 100%;
		text-align: center;
	}
	.top-bar .js-search {
		display: none;
	}
}
How to swap the search and open menu icons in the mobile header?
Add this code in Wasabi Settings -> Appearance -> Custom CSS.
@media screen and (max-width: 666px) {
  .top-bar .right {
    order: 1;
  }
  .top-bar .logo-container {
    order: 2;
  }
  .top-bar #js-subheader-menu-opener {
    order: 3;
  }
}
How to display the featured image at full width at the beginning of the posts?
If you want the change to apply to all entries on the site:
Add this CSS code in Settings of Wasabi -> Appearance -> Custom CSS.
body {
  overflow-x: hidden;
}

article .content .thumbnail {
  position: relative;
  max-width: none;
  width: 100vw;
  left: calc(-50vw + 50%);
}
If you want the change to apply to a single entry:
In the post editor, add a Gutenberg block called Custom HTML and, inside that block, add this code:
<style>
body {
  overflow-x: hidden;
}

article .content .thumbnail {
  position: relative;
  max-width: none;
  width: 100vw;
  left: calc(-50vw + 50%);
}
</style>
How to enable infinite scroll?
Wasabi Theme does not include any feature to list items with infinite loading, but, since version 0.21.6, it is compatible with plugins that allow to enable this functionality.
To enable it, you must install one of these two plugins (one, not both):
- YITH Infinite Scrolling
- Catch Infinite Scroll
YITH Infinite Scrolling configuration
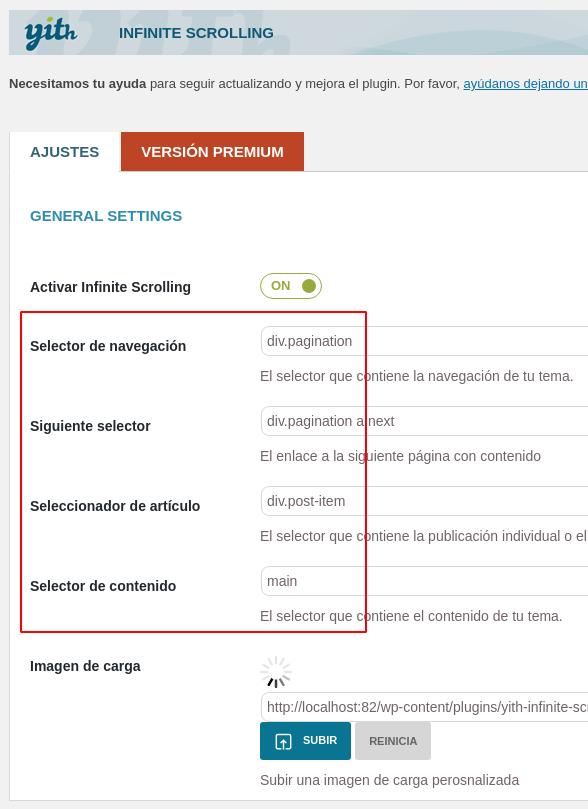
Catch Infinite Scroll configuration
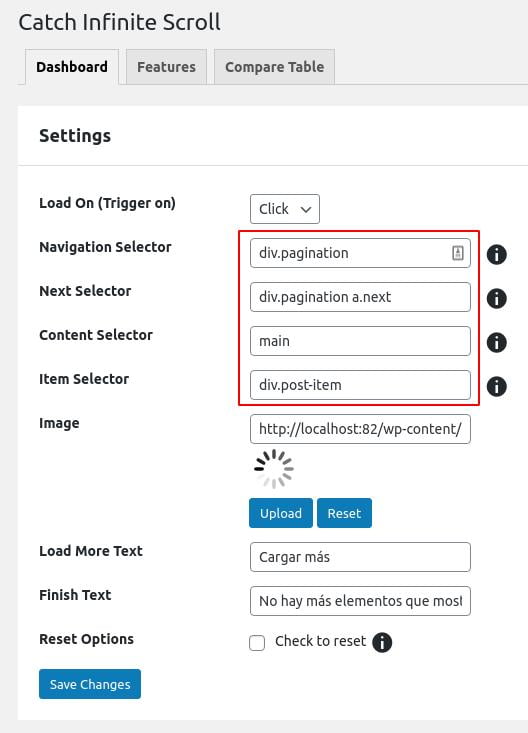
Note: Infinite scroll has not been integrated into the theme because it is not the standard for linking to articles and because in some cases it can cause serious indexing problems.
How to automatically load the next article when scrolling
When we are reading an article and we reach the end, we may want to read the next one automatically. To achieve this, you can use this plugin.
To configure it, change the value of "Main Container Class" to main-section
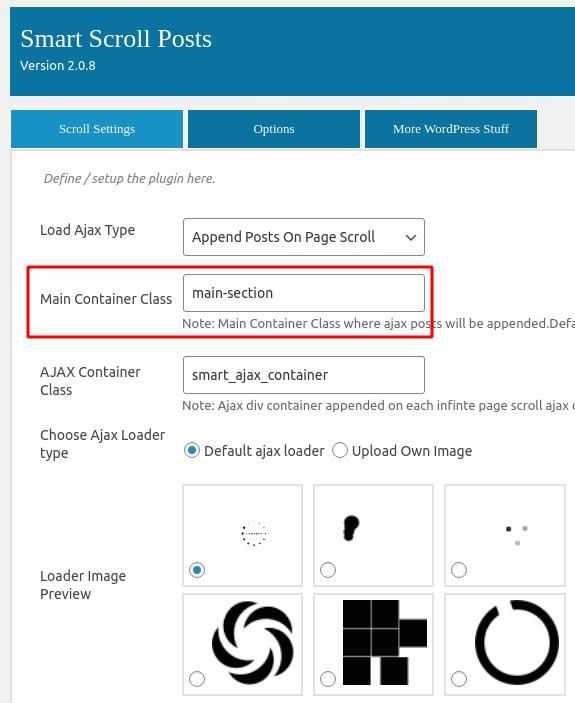
Paste the following template code at "CUSTOM MARKUP":
<article id='post-#postID' class='#post_class'>
<header class="heading">
<h1>#post_title</h1>
</header>
<div class='content'>
<header class='entry-header'>
</header>
<div class='entry-content'>
<p>#post_content</p></div>
</div>
</article>
Whatever you define in this template will be displayed when a new article is loaded when scrolling to the end of the previous one.
You can use other tags such as #post_title, #post_content, #post_image, as well as change the HTML markup.
This is the template that shows the title and content of a basic Wasabi article. If you need to display something else, such as breadcrumbs, author box, featured image, etc. we recommend contacting the support of the plugin in question.
How to create a floating menu button like Orbital?
To fix the menu open button at the bottom right on mobile devices, you have to add one of these two codes in the Appearance -> Custom CSS section:
If you do NOT use the “back to top” option
@media only screen and (max-width: 600px) {
	button#js-subheader-menu-opener {
		position: fixed;
		top: auto!important;
		bottom: 30px!important;
		right: 30px;
		height: auto;
		background: white;
		border-radius: 50%;
		box-shadow: 0px 5px 10px 0px rgb(0 0 0 / 50%);
		width: 50px;
		padding: 12px;
		z-index: 999999;
	}
	.subheader-opened .top-bar {
		z-index: 9999;
		background: none;
		border-top: none;
	}
	.subheader-opened .logo-container,
	.subheader-opened .right {
		display: none;
	}
	.subheader-opened #js-subheader {
		position: fixed;
		top: 0;
		bottom: 0;
		overflow-y: scroll;
		overflow-x: hidden;
	}
}
If you use the “Back to top” option.
@media only screen and (max-width: 600px) {
	button#js-subheader-menu-opener {
		position: fixed;
		top: auto!important;
		bottom: 90px!important;
		right: 30px;
		height: auto;
		background: white;
		border-radius: 50%;
		box-shadow: 0px 5px 10px 0px rgb(0 0 0 / 50%);
		width: 50px;
		padding: 12px;
		z-index: 999999;
	}
	.subheader-opened .top-bar {
		z-index: 9999;
		background: none;
		border-top: none;
	}
	.subheader-opened .logo-container,
	.subheader-opened .right {
		display: none;
	}
	.subheader-opened #js-subheader {
		position: fixed;
		top: 0;
		bottom: 0;
		overflow-y: scroll;
		overflow-x: hidden;
	}
}Result:
This type of menu opening was popularized by the Orbital Theme menu, and can now be easily achieved with CSS to achieve this result:
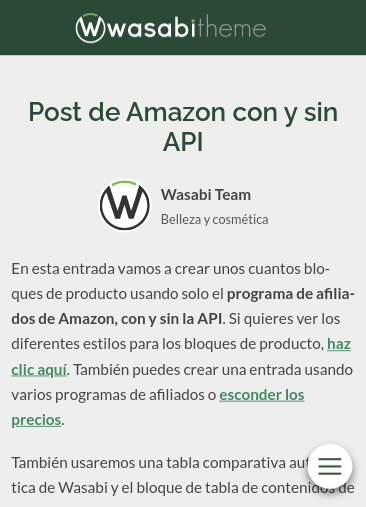
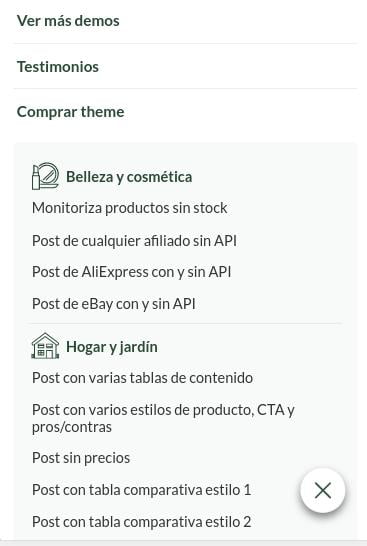
Adjustments:
You can change 600px to the maximum width at which you want to see the floating button.
You can also change the right margin by changing the value of right: 30px;
The width and height of the button is adjusted by changing the value of width: 50px;
By changing the background: #ffffff; you would change the background color of the button.
To change the color of the icon, you would have to add the following rule (changing #000000 to the desired color):
button#js-subheader-menu-opener svg.main-color * {
	fill: #000000;
}
The featured images in clusters (thumbnails) appear cropped, why?
The thumbnail size for cluster images, related, recent and featured posts in Wasabi is 300x200px.
So that all images have the same proportion what WordPress does when you upload an image is to adjust it to that size and crop it to maintain the proportion. For this reason, some images may appear cut off. We have two ways to solve it:
- Option 1 (recommended): create featured images following the 3:2 aspect ratio. This will ensure that the thumbnail size (300×200) fits perfectly with the available space, and it will also allow using the thumbnail, not loading the full version of the photo (better WPO).
- Option 2: force the loading of the full version of the photo. This option is not recommended because we do not achieve the WPO improvement that we would get with option 1.
How to implement option 1
Upload the new featured images in a size that follows the 3:2 ratio, e.g. 600x400px, 1200x800px, etc.
If there are already featured images uploaded, you re-upload them with the new dimension.
How to implement option 2
To start, you have to create and install a Wasabi child theme.
Then, add the following to the functions.php file of the child theme:
add_action( 'init', function () {
    remove_image_size( 'archive-post-thumbnail' );
}, 999 );
To finish, install this plugin and run this functionality with the indicated options checked:
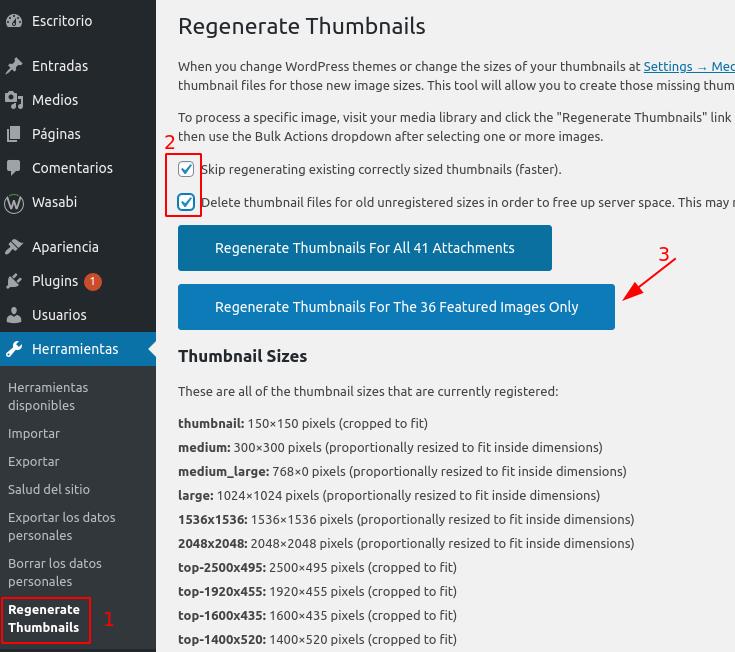
This plugin only needs to be executed once: what it does is to remove the 300×200 version of the existing featured images so that Wasabi does not load them. As we have removed the size definition in the file functions.php, the featured images uploaded from now on will simply not generate the 300×200 version, so there would be no need to run the plugin again.
Now the clusters will load the full version without maintaining any aspect ratio, so you would have to view the full image.
In some parts of the text, there is no distinction between bold or heading and normal text, why?
This is a problem you may encounter if you use some Google fonts.
Solution: choose another source. Why? Because some Google fonts do not include their bold version.
The bold text appears blurred, why?
To optimize the WPO, by default we only load 3 variants for each selected font: normal, bold and italic. It is possible that the blurred text is not really a bold and is a semi-bold or an extra-bold. To load these styles, you have to check this option:
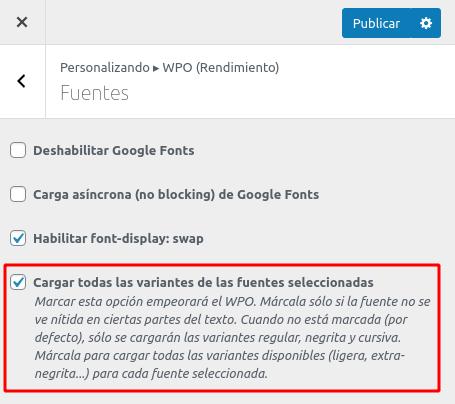
I change the font of the headings, but I don’t see the changes. Why?
The font of the headings affects the elements h1, h2, h3, h4, etc. Are you sure the element you expect to see the changes in is a header? It could be a bold paragraph. Example:
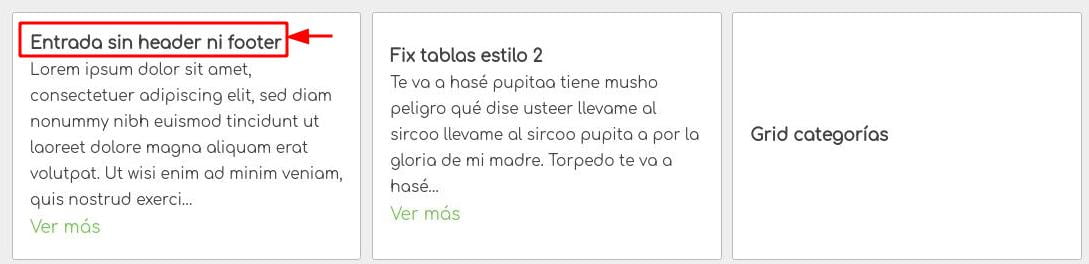
Can I use Font Awesome with Wasabi?
Wasabi does not load any external sources and only uses the resources it needs in SVG format. In this way, we can greatly improve the loading speed.
That’s why if you want to use Font Awesome you will have to install its official plugin from the WordPress plugin repository.
Once installed, to display the icons you will have to select this option in the plugin settings:
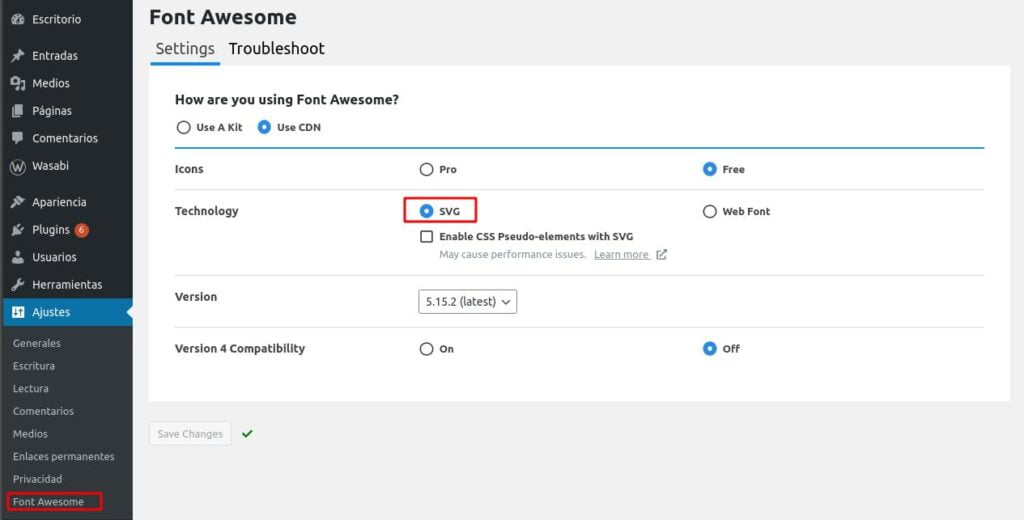
How can I exclude pages from the search engine?
You may want to remove some specific pages from the WordPress search engine results (e.g. cookie policy, contact or privacy policy).
For this purpose, we recommend installing the “Search Exclude” plugin, which is 100% optimized for this purpose.
Here you can see how to use it: https://searchwp.com/how-to-exclude-pages-from-site-search-results-in-wordpress/
How to remove or change the color of the shadow of the search form for categories and pages?
If you want to disable the effect globally (in categories and landings with search form), add this code in Appearance > custom CSS:
.hero:after{
    content: none;
}
If you want to disable it only on a specific landing page, insert a Gutenberg HTML block with this code:
<style>
hero:after{
    content: none;
}
</style>
If you want to change the color, add this code in Appearance > custom CSS, changing the color #000000 for the CSS color you want and opacity for the degree of transparency you want (it goes from 0 to 1 and you have to use dots for decimals)
.hero:after{
    background: #000000;
    opacity: 0.5;
}
How can I remove the search form from the categories?
Add this code under Appearance > Custom CSS:
.category .hero .search-form, .category .hero .title:after {
    display:none;
}

.category .hero .title {
    margin: 0;
    padding: 0;
}
How can I remove the search form from landing pages with a search form?
In the post editor, add a Gutenberg block called Custom HTML and, inside that block, add this code:
<style>
.hero .search-form, .hero .title:after {
    display:none;
}

.hero .title {
    margin: 0;
    padding: 0;
}
</style>
How can I insert a search box or search form?
You can insert a search engine in a page in several ways:
Option 1 (pages only):
- Open the page for editing.
- In the page settings sidebar, select “Landing with search form.”
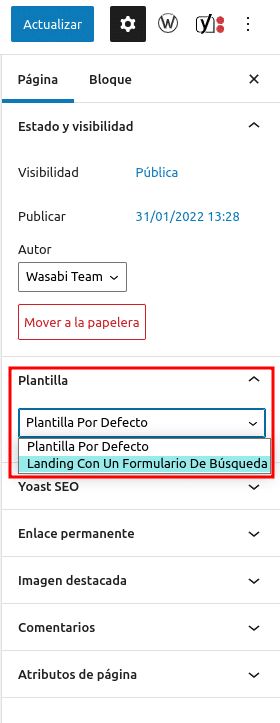
Option 2 (pages and entries):
- Insert the native Gutenberg block “Search” with this configuration:
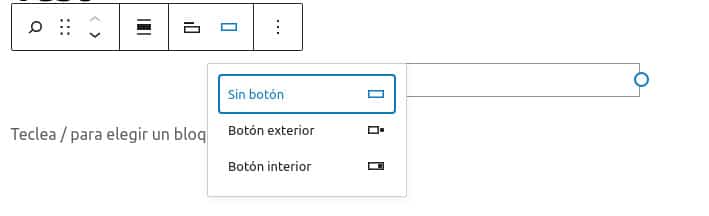
How can I remove the automatic cluster of recent posts?
You can hide related posts from Appearance > Posts > Number of related posts to display > 0.
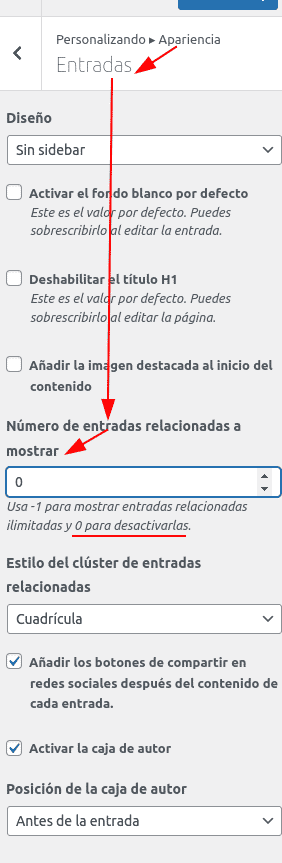
How can I prevent words from being cut off at the end of each line in a paragraph?
To prevent syllables from breaking, add this CSS in Appearance > Custom CSS:
article li, article p {
  hyphens: none;
}
📢 Plugins
What plugins do you recommend to complement Wasabi Theme?
Wasabi is intended to be an all-in-one solution, so it does not rely on any extra plugins to take advantage of its full functionality.
In addition, we recommend the installation of 4 free plugins:
- Yoast SEO o RankMath: can be helpful for improving SEO content.
- W3 Total Cache o WP Rocket (paid): Wasabi has a product cache (to reduce response time and external API consumption) and offers state-of-the-art WPO optimization, but using these plugins along with your server configuration can achieve the best possible page load speed.
- Loco Translate: for translating the plugin or changing almost any default text displayed in the template.
Is Wasabi Theme compatible with Elementor?
Yes, it is fully compatible.
Is Wasabi Theme compatible with WooCommerce?
Yes, it is fully compatible and optimized for it. You can see a demo here.
Is Wasabi Theme compatible with Page Generator Pro and WordPress Automatic?
Yes, it is fully compatible. You can generate the content using Gutenberg block markup or shortcodes.
Is Wasabi compatible with AMP?
Yes, Wasabi is AMP compliant.
How to enable AMP
- Install and activate the official AMP plugin for WordPress.
- Configure the plugin using its setup wizard.
- During the setup wizard, when prompted to choose a template mode, select “Transitional”.
- If you skip the above step, you can always configure the template from the AMP menu -> Settings.
We recommend, in addition to selecting the Transitional template, to display only AMP on posts and pages, as this will be the content that is typically displayed, for example, in Discover.
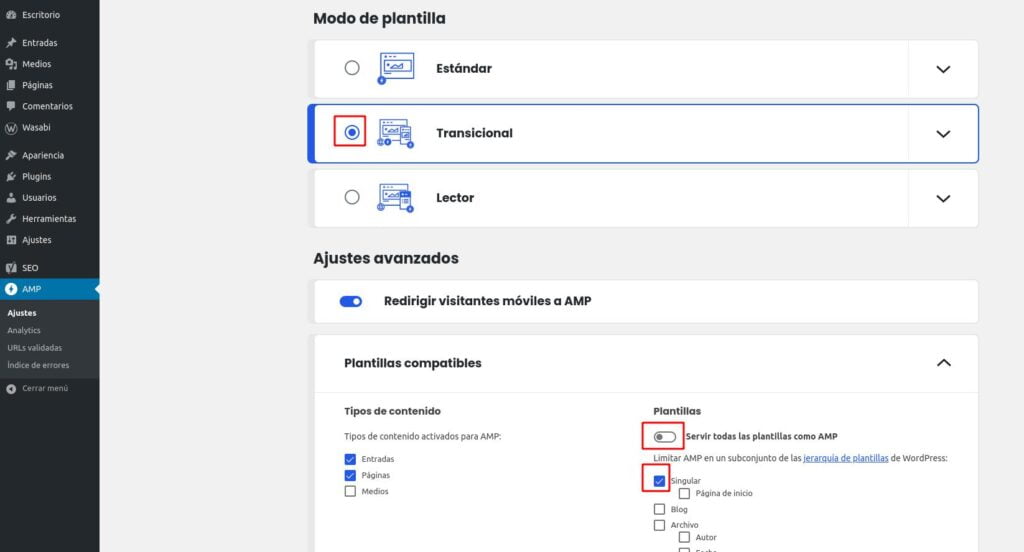
You can also disable AMP on specific posts or pages:
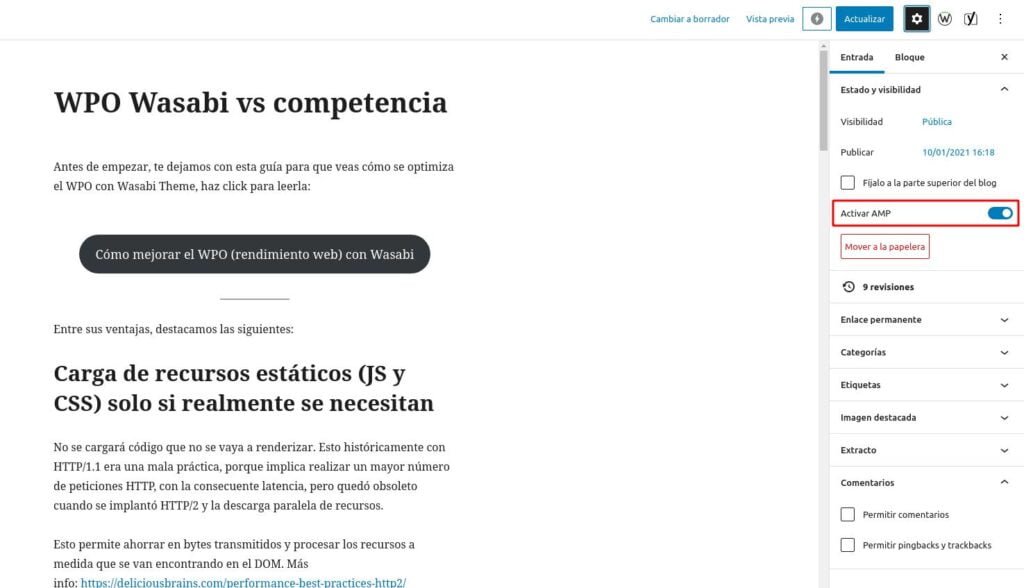
Limitations:
AMP, by definition, does not allow loading custom Javascript files, so three Wasabi functions do not work with AMP, although we propose a replacement for each of them:
- Cookie Notice: Wasabi’s cookie notice feature will not work. We recommend installing the WP GDPR Cookie Notice plugin instead. This plugin is compatible with AMP and will also allow (optionally) the analytics code and ads configured in Wasabi not to load if the user has not given consent.
- Product comparison table Style 1: This style uses JavaScript to adapt content on mobile devices. We recommend using Style 2.
- Link Obfuscation: Wasabi’s link obfuscation uses JavaScript to hide and activate the link. You won’t have to do anything; regular links will simply be displayed.
All other features and blocks are fully supported and no bugs have been reported to date.
➕ Others
How to report a problem
To report an issue, please contact us using this contact form, detailing your problem and including:
- Reason: technical support.
- Your license.
- The URL affected at this moment.
- Site health report (how to get it).
These files would also be very useful:
- Debug log (how to get it)
- Screenshots (if visible) to visualize the problem. Videos explaining the process could also help.
Other useful information:
- Sometimes, we may ask for your wp-admin and FTP administrative level credentials to expedite the detection and resolution of the problem, but you can be proactive and include them in your initial ticket if you want to save some communication time.
Obtain a site health report
Go to Tools -> Site Health (or go directly to /wp-admin/site-health.php?tab=debug)
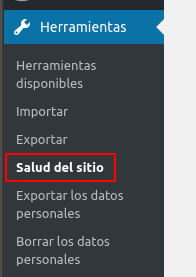
Click on the “Copy site information to clipboard” button.
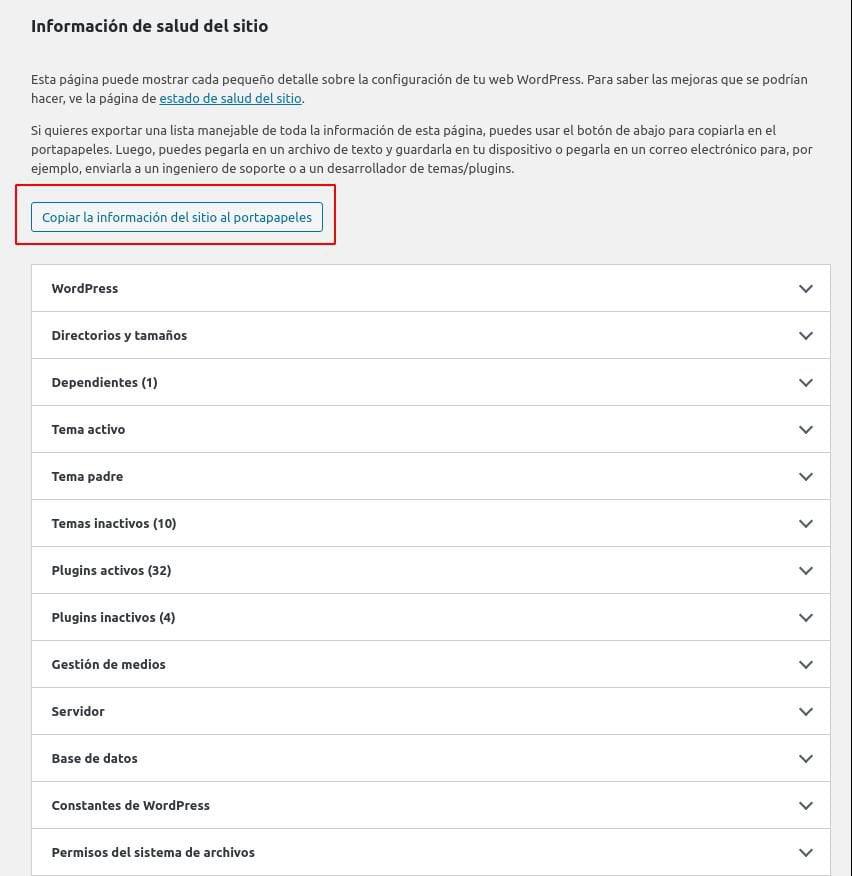
Create a .txt file with the content you copied and attach it to the support ticket.
Obtain the debugging log
We recommend attaching a WordPress debug log to facilitate problem detection and resolution. This will provide details that may be hidden to the human eye. How is it done?
Add these lines to your file wp-config.php
define ( 'WP_DEBUG', true ) ;
define ( 'WP_DEBUG_DISPLAY', false ) ;
define ( 'WP_DEBUG_LOG', true ) ;
Most WordPress installations already have a WP_DEBUG entry set to false, in which case you will need to change false to true.
You can edit this file by connecting to your server via SSH or FTP and navigating to the root of your WordPress installation.
Now you must reproduce the problem so that the entry is created in the debug log. Simply do the same thing again as when the problem occurred, repeating the operation or refreshing the failed page.
The debug log should have been created in the wp-content folder of your WordPress installation with the name debug.log
You can read it or download it directly via FTP. You can also install the Log Viewer plugin to access the log directly from the WordPress administration panel.
List of shortcodes substitutes for Gutenberg blocks
In some cases you may need to dispense with Wasabi’s block editing (to create automatic websites, out of habit, etc.).
In those cases, you should know that ALL Wasabi Gutenberg blocks have a shortcode version.
Here is the list of available shortcodes with the definition of attributes and their possible values.
Category grid
Shortcode:
[
wasabi_categories_grid]
Example:
[
wasabi_categories_grid include_featured_posts="true"]
Attributes and values of each attribute:
- include_featured_posts
- true
- false or undefined
- exclude_subcategories
- true
- false or undefined
- only_sibling_categories
- true
- false or undefined
- only_subcategories
- true
- false or undefined
- order_criteria
- name
- term_id
- count
- order_direction
- ASC
- DESC
Product
Shortcode:
[
wasabi_product]
Example:
[
wasabi_product data_source="amazon" item_id="XXXXXXX" name="Nombre de producto"]
Attributes:
- data_source
- none
- amazon
- ebay
- aliexpress
- item_id
- Empty if you use none as data_source
- ASIN if you use amazon as data_source
- Product ID from eBay or AliExpress if you use ebay or aliexpress as data_source
- name
- Product name
- If data_source is configured and the API is set up, this field can be left empty and will be populated with data from the API
- price
- Product price
- If data_source is configured and the API is set up, this field can be left empty and will be populated with data from the API
- url
- Product URL
- If data_source is configured and the API is set up, this field can be left empty and will be populated with data from the API
- image_url
- Product image URL. You can use an external image URL or upload an image to the WordPress library
- If data_source is configured and the API is set up, this field can be left empty and will be populated with data from the API
- advantages
- Product advantages separated by commas
- If data_source is configured and the API is set up, this field can be left empty and will be populated with data from the API
- disadvantages
- Product disadvantages separated by commas
- If data_source is configured and the API is set up, this field can be left empty and will be populated with data from the API
- review
- Free text field for product review
- display_name
- Show/hide the name
- true (default) or false
- display_image
- Show/hide the image
- true (default) or false
- display_first_cta
- Show/hide the first CTA
- true (default) or false
- display_second_cta
- Show/hide the second CTA
- true (default) or false
- display_review
- Show/hide the product description (if any)
- true (default) or false
- display_features
- Show/hide pros/cons (if any)
- true (default) or false
- display_price
- Show/hide the price (if any)
- true (default) or false
- display_discount
- Show/hide the discount percentage (if any)
- true (default) or false
- display_price_before_discount
- Show/hide the price before discount (if any)
- true (default) or false
- display_data_source_logo
- Show/hide the data source logo
- true (default) or false
- display_prime_logo
- Show/hide the prime logo
- true (default) or false
- style
- Product style
- Available styles: 1, 2, 3, 4
- Default: 1
- first_cta_style
- Style of the first product CTA button
- Available styles: 1 to 5
- Default: 1
- first_cta_text
- Text of the first product CTA button
- second_cta_style
- Style of the second product CTA button
- Available styles: 1 to 5
- Default: 2
- second_cta_text
- Text of the second product CTA button
- price_style
- Style of the price and discount
- Available styles: 1 to 5
- Default: 1
- name_style
- Style of the name
- Available styles: 1 to 3
- Default: 1
- num_features_columns
- Maximum number of columns in advantages and disadvantages
- From 1 to 2
- Default: 1
- max_features:
- Maximum number of advantages and disadvantages to display
- Default: 20
- max_num_words_in_features
- Maximum number of words to display in each advantage/disadvantage
- 0 = show all words (default)
- features_style
- Style of the advantages and disadvantages block
- Available styles: 1 to 3
- Default: 1
- max_num_words_in_product_name
- Maximum number of words to display in the product name
- 0 = show all words (default)
- exclude_from_comparison_table
- Exclude the product from automatic comparison tables?
- true or false
- Default: false
- auto_comparison_table_badge_text
- Text of the badge in comparison tables (if not used, no badge is displayed)
- auto_comparison_table_badge_color
- Color of the badge in comparison tables (if not used, no badge is displayed)
Product comparison
Shortcode:
[
wasabi_product_comparison]
Example:
[
wasabi_product_comparison title="Título de la comparativa"]
Attributes:
- title
- Text h2 that will appear above the comparison table.
- You can leave it empty so the comparison does not have a title.
- max_products
- Maximum number of products in the comparison table.
- Default: unlimited
- characteristics_delimiter
- style
- Style of the comparison table.
- Available styles: 1 and 2
- Default: 1
- max_features
- Maximum number of features listed for each product.
- Default: 5
- display_name
- Show/hide the name
- true (default) or false
- display_image
- Show/hide the image
- true (default) or false
- display_first_cta
- Show/hide the first CTA
- true (default) or false
- display_second_cta
- Show/hide the second CTA
- true (default) or false
- display_review
- Show/hide the product description (if any)
- true (default) or false
- display_features
- Show/hide pros/cons (if any)
- true (default) or false
- display_price
- Show/hide the price (if any)
- true (default) or false
- display_discount
- Show/hide the discount percentage (if any)
- true (default) or false
- display_price_before_discount
- Show/hide the price before discount (if any)
- true (default) or false
- display_data_source_logo
- Show/hide the data source logo
- true (default) or false
- display_prime_logo
- Show/hide the prime logo
- true (default) or false
- style
- Style of the comparison.
- Available styles: 1, 2
- Default: 1
- first_cta_style
- Style of the first product CTA button
- Available styles: 1 to 5
- Default: 1
- first_cta_text
- Text of the first product CTA button
- second_cta_style
- Style of the second product CTA button
- Available styles: 1 to 5
- Default: 1
- second_cta_text
- Text of the second product CTA button
- price_style
- Style of the price and discount
- Available styles: 1 to 5
- Default: 1
- name_style
- Style of the name
- Available styles: 1 to 3
- Default: 1
- max_features:
- Maximum number of pros and cons to show
- Default: 5
- max_num_words_in_features
- Maximum number of words to display in each advantage/disadvantage
- 0 = show all words
- Default: 4
- features_style
- Style of the advantages and disadvantages block
- Available styles: 1 to 3
- Default: 2
- max_num_words_in_product_name
- Maximum number of words to display in the product name
- 0 = show all words (default)
List of best sellers or best selling products
Shortcode:
[
wasabi_best_seller_products]
Example:
[
wasabi_best_seller_products data_source="amazon" num_products="9" num_columns="3" search_term="Mochilas"]
Attributes:
- search_term
- Term to search for the best-selling products in the data source (data_source)
- Mandatory.
- data_source (obligatorio, recuerda configurar la API primero)
- amazon
- ebay
- aliexpress
- max_products
- Maximum number of products.
- Default: 9
- Minimum: 1
- Maximum: 30
- style
- Style.
- Available styles: de 1 a 4
- Default: 3
- max_features
- Maximum number of features listed for each product.
- Default: 5
- display_name
- Mostrar/ocultar el nombre
- true (por defecto) o false
- display_image
- Show/hide the name
- true (default) or false
- display_first_cta
- Show/hide the image
- true (default) or false
- display_second_cta
- Show/hide the second CTA
- true (default) or false
- display_review
- Show/hide the product description (if any)
- true (default) or false
- display_features
- Show/hide pros/cons (if any)
- true (default) or false
- display_price
- Show/hide the price (if any)
- true (default) or false
- display_discount
- Show/hide the discount percentage (if any)
- true (default) or false
- display_price_before_discount
- Show/hide the price before discount (if any)
- true (default) or false
- display_data_source_logo
- Show/hide the data source logo
- true (default) or false
- display_prime_logo
- Show/hide the prime logo
- true (default) or false
- style
- Style of the comparison.
- Available styles: 1, 2
- Default: 1
- first_cta_style
- Style of the first product CTA button
- Available styles: 1 to 5
- Default: 1
- first_cta_text
- Text of the first product CTA button
- second_cta_style
- Style of the second product CTA button
- Available styles: 1 to 5
- Default: 1
- second_cta_text
- Text of the second product CTA button
- price_style
- Style of the price and discount
- Available styles: 1 to 5
- Default: 1
- name_style
- Style of the name
- Available styles: 1 to 3
- Default: 1
- max_features:
- Maximum number of pros and cons to show
- Default: 5
- max_num_words_in_features
- Maximum number of words to display in each advantage/disadvantage
- 0 = show all words
- Default: 8
- features_style
- Style of the advantages and disadvantages block
- Available styles: 1 to 3
- Default: 3
- max_num_words_in_product_name
- Maximum number of words to display in the product name
- 0 = show all words
- Default: 8
Column and table of contents
The content of the shortcode will be the content displayed inside the content column.
Shortcode:
- [
wasabi_column_and_table_of_contents]Contenido[/wasabi_column_and_table_of_contents]
Example:
[
wasabi_column_and_table_of_contents include_h3="true"]Contenido[/wasabi_column_and_table_of_contents]
Attributes:
- min_headings
- Minimum number of headings required to create the table of contents.
- Default: 2
- include_h3
- Should h3 headings be considered to create the table of contents?
- true or false
- Default: false
- include_products
- Should product titles be considered to create the table of contents?
- true or false
- Default: true
GDPR Text
Shortcode:
[
wasabi_gdpr_form_text responsible="Nombre del responsable"]
Example:
[
wasabi_gdpr_form_text responsible="Nombre del responsable" purpose="Propósito del tratamiento"]
Attributes:
All attributes are of text type and are optional.
- responsible
- purpose
- legitimation
- recipients
- rights
Cluster of entries or pages
Shortcode:
[
wasabi_cluster]
Example of a cluster of the 6 most recent entries on the site:
[
wasabi_cluster type="recent_posts" posts_limit="6"]
Example of a cluster of category entries with ID 4:
[
wasabi_cluster type="category_posts" posts_limit="100" category_id="4"]
Example of a cluster of specific inputs:
[
wasabi_cluster type="selected_posts" selected_posts_ids_array="15708,15527,15620"]
Attributes:
- style
- Cluster style.
- Allowed values: from 1 to 10.
- Default: 1
- type
- Default: recent_posts
- recent_posts: a cluster of recent posts will be created.
- selected_posts: a cluster of specific manually selected posts will be created. You will need to fill in the selected_posts_ids attribute.
- selected_pages: a cluster of specific manually selected pages will be created. You will need to fill in the selected_pages_ids attribute.
- category_posts: a cluster of posts from a specific category will be created. You will need to fill in the category_id attribute.
- tag_posts: a cluster of posts from a specific tag will be created. You will need to fill in the tag_id attribute.
- featured_status
- with_featured: includes both featured and non-featured posts.
- featured_only: includes only the featured posts.
- without_featured: includes only the non-featured posts.
- posts_limit
- Limit the number of posts in the cluster.
- Default: 30
- tag_id
- Tag ID of the posts in a cluster. Only applies if tag_posts is chosen in the type attribute.
- category_id
- Category ID of the posts in a cluster. Only applies if category_posts is chosen in the type attribute.
- selected_posts_ids_array
- Comma-separated post IDs. They will appear in the cluster. Only applies if selected_posts is chosen in the type attribute.
- Example: “15708,15527,15620”
- selected_pages_ids_array
- Comma-separated page IDs. They will appear in the cluster. Only applies if selected_pages is chosen in the type attribute.
- Example: “15708,15527,15620”
Links to social networks
Shortcode:
[
wasabi_social_links]
Example:
[
wasabi_social_links facebook_url="https://www.facebook.com/"]
Attributes:
- facebook_url
- twitter_url
- instagram_url
- pinterest_url
- youtube_url
Testimonial
Shortcode:
[
wasabi_testimonial]
Example:
[
wasabi_testimonial author_name="Nombre de la persona que opina" rating="4" quote="Este es el texto de la opinión"]
Attributes:
- style
- Testimonial style.
- Allowed values: 1 or 2
- Default: 1
- author_name
- Name of the testimonial author
- author_image_url
- URL of the testimonial author’s avatar
- rating
- Number of stars or testimonial rating.
- From 0 to 5
- quote
- Testimonial text.
- enable_structured_data
- true or false
- Default: false
- Enable AggregateRating structured data (black hat).
Advertisement
Shortcode:
[
wasabi_ad]
Example:
[
wasabi_ad ad_id="1"]
Attributes:
- ad_id
- ID of the ad configured from the Wasabi Theme configurator.
- Value: from 1 to 10
Do you have an affiliate program to refer sales and earn money by recommending Wasabi Theme?
We offer one of the best affiliate programs on the WordPress market, with which you can earn money by helping us distribute Wasabi Theme.
You promote the theme and, for each referred sale, you keep 25% commission of the value of each first purchase made by new users coming from your affiliate link.
You can read more about the Wasabi affiliate program or sign up for it here: https://wasabitheme.com/affiliates/
For more information about the terms and conditions, check: https://wasabitheme.com/legal-notes/#programa-de-afiliados
How do you install the Wasabi child theme?
A child theme is a theme that inherits the functionality and styles of a parent theme. Its primary use is to allow customization of the parent theme files, without having to worry about updates overwriting those changes.
If you need to change any aspect of Wasabi Theme by code, we recommend that you use a child theme. The code you add in the child theme will not be lost when you update Wasabi.
How is it installed?
- Download the Wasabi Theme child theme: wasabi-child.
- Navigate to Appearance > Themes > Add new > Upload theme and upload the .zip file you downloaded.
Caution: if you install a child theme, you will have to reconfigure the theme settings under customization. If you re-activate the parent theme, you will get it back.
How can I enable the RSS feed?
The RSS(Really Simple Syndication) Feed provides, in a standardized way, access to updates of a site’s content to users and other web applications.
By default Wasabi Theme does not show it to improve the WPO, but you can enable it in the following way:
Configure the feed settings
Go to Settings –> Reading and configure the following fields with the values you consider:

Install a child theme
You need it because we are going to edit the functions.php file. With this, we prevent the loss of modifications when Wasabi is upgraded to a new version.
Edit the functions.php file of the child theme
If you want to enable the general feed, you must add these two lines in the functions.php file of the child theme:
add_theme_support( 'automatic-feed-links' );
add_action( 'wp_head', 'feed_links', 2 );
If you also want to enable extra feeds, in addition to the above 2 lines, you must add the following:
add_action( 'wp_head', 'feed_links_extra', 3 );
add_action( 'wp_head', 'feed_links', 2 );
How can I migrate my site from AAWP, Orbital, or another template to Wasabi Theme?
There is no automated way to migrate a site from another theme or plugin to Wasabi Theme, as each site is different and 100% of the times we have tried, something has not been as it should.
We recommend you to create a test site (also called staging site) to be able to install Wasabi Theme, adapt the content, purge plugins, validate that everything is correct and then restore the test site on the real site. This way the site will always be active and visitors will not notice the change.
Option 1 (manual)
- Create a subdomain on your hosting provider (using cPanel, Plesk, or whichever control panel it offers).
- Make a copy of the website on the subdomain (either manually by copying/pasting files, etc., or using a plugin like All-in-One WP Migration or Duplicator).
- Block the crawling of the copied website on the subdomain, so Google doesn’t index it and consider it duplicate content.
- Install Wasabi Theme on the subdomain website.
- Configure Wasabi Theme and make the necessary changes to the content (posts, pages, menus, categories, etc.) on the subdomain website.
- When you believe everything is correct:
- Make a copy of the subdomain website to the main website (the reverse process of what you did in step 2).
- On the main website (now with the content copied from the subdomain), unblock crawling.
- Delete the subdomain because it’s no longer needed.
Option 2 (by requesting it to the hosting)
You can ask your hosting support to see if they can create a test site themselves. This saves you steps 1, 2 and 6.1 (the most tedious and mechanical).
After working on the test site, you would have to ask them again to restore the main site with the content and database of the test site.
Option 3 (with a plugin)
You can create a testing environment using a plugin called WP Staging.
Here you can find several guides on its use:
Already have Wasabi Theme, can’t find what you’re looking for in the documentation, and need technical support? Click here.
Featured blog entries